 |
Irrlicht 3D Engine
|


|
|
Irrlicht 3D Engine
|
|
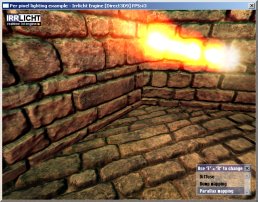
This tutorial shows how to use one of the built in more complex materials in irrlicht: Per pixel lighted surfaces using normal maps and parallax mapping. It will also show how to use fog and moving particle systems. And don't panic: You do not need any experience with shaders to use these materials in Irrlicht.
At first, we need to include all headers and do the stuff we always do, like in nearly all other tutorials.
#include <irrlicht.h>
#include "driverChoice.h"

using namespace irr;

#ifdef _MSC_VER
#pragma comment(lib, "Irrlicht.lib")
#endif
For this example, we need an event receiver, to make it possible for the user to switch between the three available material types. In addition, the event receiver will create some small GUI window which displays what material is currently being used. There is nothing special done in this class, so maybe you want to skip reading it.
class MyEventReceiver : public IEventReceiver
{
public:

    MyEventReceiver(scene::ISceneNode* room,scene::ISceneNode* earth,
        gui::IGUIEnvironment* env, video::IVideoDriver* driver)
    {
        // store pointer to room so we can change its drawing mode
        Room = room;
        Earth = earth;
        Driver = driver;

        // set a nicer font
        gui::IGUISkin* skin = env->getSkin();
        gui::IGUIFont* font = env->getFont("../../media/fonthaettenschweiler.bmp");
        if (font)
            skin->setFont(font);

        // add window and listbox
        gui::IGUIWindow* window = env->addWindow(
            core::rect<s32>(460,375,630,470), false, L"Use 'E' + 'R' to change");

        ListBox = env->addListBox(
            core::rect<s32>(2,22,165,88), window);

        ListBox->addItem(L"Diffuse");
        ListBox->addItem(L"Bump mapping");
        ListBox->addItem(L"Parallax mapping");
        ListBox->setSelected(1);

        // create problem text
        ProblemText = env->addStaticText(
            L"Your hardware or this renderer is not able to use the "\
            L"needed shaders for this material. Using fall back materials.",
            core::rect<s32>(150,20,470,80));

        ProblemText->setOverrideColor(video::SColor(100,255,255,255));

        // set start material (prefer parallax mapping if available)
        video::IMaterialRenderer* renderer =
            Driver->getMaterialRenderer(video::EMT_PARALLAX_MAP_SOLID);
        if (renderer && renderer->getRenderCapability() == 0)
            ListBox->setSelected(2);

        // set the material which is selected in the listbox
        setMaterial();
    }

    bool OnEvent(const SEvent& event)
    {
        // check if user presses the key 'E' or 'R'
        if (event.EventType == irr::EET_KEY_INPUT_EVENT &&
            !event.KeyInput.PressedDown && Room && ListBox)
        {
            // change selected item in listbox

            int sel = ListBox->getSelected();
            if (event.KeyInput.Key == irr::KEY_KEY_R)
                ++sel;
            else
            if (event.KeyInput.Key == irr::KEY_KEY_E)
                --sel;
            else
                return false;

            if (sel > 2) sel = 0;
            if (sel < 0) sel = 2;
            ListBox->setSelected(sel);

            // set the material which is selected in the listbox
            setMaterial();
        }

        return false;
    }

private:

    // sets the material of the room mesh the the one set in the
    // list box.
    void setMaterial()
    {
        video::E_MATERIAL_TYPE type = video::EMT_SOLID;

        // change material setting
        switch(ListBox->getSelected())
        {
        case 0: type = video::EMT_SOLID;
            break;
        case 1: type = video::EMT_NORMAL_MAP_SOLID;
            break;
        case 2: type = video::EMT_PARALLAX_MAP_SOLID;
            break;
        }

        Room->setMaterialType(type);

        // change material setting
        switch(ListBox->getSelected())
        {
        case 0: type = video::EMT_TRANSPARENT_VERTEX_ALPHA;
            break;
        case 1: type = video::EMT_NORMAL_MAP_TRANSPARENT_VERTEX_ALPHA;
            break;
        case 2: type = video::EMT_PARALLAX_MAP_TRANSPARENT_VERTEX_ALPHA;
            break;
        }

        Earth->setMaterialType(type);
We need to add a warning if the materials will not be able to be displayed 100% correctly. This is no problem, they will be rendered using fall back materials, but at least the user should know that it would look better on better hardware. We simply check if the material renderer is able to draw at full quality on the current hardware. The IMaterialRenderer::getRenderCapability() returns 0 if this is the case.
        video::IMaterialRenderer* renderer = Driver->getMaterialRenderer(type);

        // display some problem text when problem
        if (!renderer || renderer->getRenderCapability() != 0)
            ProblemText->setVisible(true);
        else
            ProblemText->setVisible(false);
    }

private:

    gui::IGUIStaticText* ProblemText;
    gui::IGUIListBox* ListBox;

    scene::ISceneNode* Room;
    scene::ISceneNode* Earth;
    video::IVideoDriver* Driver;
};
Now for the real fun. We create an Irrlicht Device and start to setup the scene.
int main()
{
    // ask user for driver
    video::E_DRIVER_TYPE driverType=driverChoiceConsole();
    if (driverType==video::EDT_COUNT)
        return 1;

    // create device

    IrrlichtDevice* device = createDevice(driverType,
            core::dimension2d<u32>(640, 480));

    if (device == 0)
        return 1; // could not create selected driver.
Before we start with the interesting stuff, we do some simple things: Store pointers to the most important parts of the engine (video driver, scene manager, gui environment) to safe us from typing too much, add an irrlicht engine logo to the window and a user controlled first person shooter style camera. Also, we let the engine know that it should store all textures in 32 bit. This necessary because for parallax mapping, we need 32 bit textures.
    video::IVideoDriver* driver = device->getVideoDriver();
    scene::ISceneManager* smgr = device->getSceneManager();
    gui::IGUIEnvironment* env = device->getGUIEnvironment();

    driver->setTextureCreationFlag(video::ETCF_ALWAYS_32_BIT, true);

    // add irrlicht logo
    env->addImage(driver->getTexture("../../media/irrlichtlogo3.png"),
        core::position2d<s32>(10,10));

    // add camera
    scene::ICameraSceneNode* camera = smgr->addCameraSceneNodeFPS();
    camera->setPosition(core::vector3df(-200,200,-200));

    // disable mouse cursor
    device->getCursorControl()->setVisible(false);
Because we want the whole scene to look a little bit scarier, we add some fog to it. This is done by a call to IVideoDriver::setFog(). There you can set various fog settings. In this example, we use pixel fog, because it will work well with the materials we'll use in this example. Please note that you will have to set the material flag EMF_FOG_ENABLE to 'true' in every scene node which should be affected by this fog.
driver->setFog(video::SColor(0,138,125,81), video::EFT_FOG_LINEAR, 250, 1000, .003f, true, false);
To be able to display something interesting, we load a mesh from a .3ds file which is a room I modeled with anim8or. It is the same room as from the specialFX example. Maybe you remember from that tutorial, I am no good modeler at all and so I totally messed up the texture mapping in this model, but we can simply repair it with the IMeshManipulator::makePlanarTextureMapping() method.
    scene::IAnimatedMesh* roomMesh = smgr->getMesh("../../media/room.3ds");
    scene::ISceneNode* room = 0;
    scene::ISceneNode* earth = 0;

    if (roomMesh)
    {
        // The Room mesh doesn't have proper Texture Mapping on the
        // floor, so we can recreate them on runtime
        smgr->getMeshManipulator()->makePlanarTextureMapping(
                roomMesh->getMesh(0), 0.003f);
Now for the first exciting thing: If we successfully loaded the mesh we need to apply textures to it. Because we want this room to be displayed with a very cool material, we have to do a little bit more than just set the textures. Instead of only loading a color map as usual, we also load a height map which is simply a grayscale texture. From this height map, we create a normal map which we will set as second texture of the room. If you already have a normal map, you could directly set it, but I simply didn't find a nice normal map for this texture. The normal map texture is being generated by the makeNormalMapTexture method of the VideoDriver. The second parameter specifies the height of the heightmap. If you set it to a bigger value, the map will look more rocky.
        video::ITexture* normalMap =
            driver->getTexture("../../media/rockwall_height.bmp");

        if (normalMap)
            driver->makeNormalMapTexture(normalMap, 9.0f);
The Normal Map and the displacement map/height map in the alpha channel video::ITexture* normalMap = driver->getTexture("../../media/rockwall_NRM.tga");
But just setting color and normal map is not everything. The material we want to use needs some additional informations per vertex like tangents and binormals. Because we are too lazy to calculate that information now, we let Irrlicht do this for us. That's why we call IMeshManipulator::createMeshWithTangents(). It creates a mesh copy with tangents and binormals from another mesh. After we've done that, we simply create a standard mesh scene node with this mesh copy, set color and normal map and adjust some other material settings. Note that we set EMF_FOG_ENABLE to true to enable fog in the room.
        scene::IMesh* tangentMesh = smgr->getMeshManipulator()->
                createMeshWithTangents(roomMesh->getMesh(0));

        room = smgr->addMeshSceneNode(tangentMesh);
        room->setMaterialTexture(0,
                driver->getTexture("../../media/rockwall.jpg"));
        room->setMaterialTexture(1, normalMap);

        // Stones don't glitter..
        room->getMaterial(0).SpecularColor.set(0,0,0,0);
        room->getMaterial(0).Shininess = 0.f;

        room->setMaterialFlag(video::EMF_FOG_ENABLE, true);
        room->setMaterialType(video::EMT_PARALLAX_MAP_SOLID);
        // adjust height for parallax effect
        room->getMaterial(0).MaterialTypeParam = 1.f / 64.f;

        // drop mesh because we created it with a create.. call.
        tangentMesh->drop();
    }
After we've created a room shaded by per pixel lighting, we add a sphere into it with the same material, but we'll make it transparent. In addition, because the sphere looks somehow like a familiar planet, we make it rotate. The procedure is similar as before. The difference is that we are loading the mesh from an .x file which already contains a color map so we do not need to load it manually. But the sphere is a little bit too small for our needs, so we scale it by the factor 50.
    // add earth sphere

    scene::IAnimatedMesh* earthMesh = smgr->getMesh("../../media/earth.x");
    if (earthMesh)
    {
        //perform various task with the mesh manipulator
        scene::IMeshManipulator *manipulator = smgr->getMeshManipulator();

        // create mesh copy with tangent informations from original earth.x mesh
        scene::IMesh* tangentSphereMesh =
            manipulator->createMeshWithTangents(earthMesh->getMesh(0));

        // set the alpha value of all vertices to 200
        manipulator->setVertexColorAlpha(tangentSphereMesh, 200);

        // scale the mesh by factor 50
        core::matrix4 m;
        m.setScale ( core::vector3df(50,50,50) );
        manipulator->transform( tangentSphereMesh, m );

        earth = smgr->addMeshSceneNode(tangentSphereMesh);

        earth->setPosition(core::vector3df(-70,130,45));

        // load heightmap, create normal map from it and set it
        video::ITexture* earthNormalMap = driver->getTexture("../../media/earthbump.jpg");
        if (earthNormalMap)
        {
            driver->makeNormalMapTexture(earthNormalMap, 20.0f);
            earth->setMaterialTexture(1, earthNormalMap);
            earth->setMaterialType(video::EMT_NORMAL_MAP_TRANSPARENT_VERTEX_ALPHA);
        }

        // adjust material settings
        earth->setMaterialFlag(video::EMF_FOG_ENABLE, true);

        // add rotation animator
        scene::ISceneNodeAnimator* anim =
            smgr->createRotationAnimator(core::vector3df(0,0.1f,0));
        earth->addAnimator(anim);
        anim->drop();

        // drop mesh because we created it with a create.. call.
        tangentSphereMesh->drop();
    }
Per pixel lighted materials only look cool when there are moving lights. So we add some. And because moving lights alone are so boring, we add billboards to them, and a whole particle system to one of them. We start with the first light which is red and has only the billboard attached.
    // add light 1 (more green)
    scene::ILightSceneNode* light1 =
        smgr->addLightSceneNode(0, core::vector3df(0,0,0),
        video::SColorf(0.5f, 1.0f, 0.5f, 0.0f), 800.0f);

    light1->setDebugDataVisible ( scene::EDS_BBOX );


    // add fly circle animator to light 1
    scene::ISceneNodeAnimator* anim =
        smgr->createFlyCircleAnimator (core::vector3df(50,300,0),190.0f, -0.003f);
    light1->addAnimator(anim);
    anim->drop();

    // attach billboard to the light
    scene::IBillboardSceneNode* bill =
        smgr->addBillboardSceneNode(light1, core::dimension2d<f32>(60, 60));

    bill->setMaterialFlag(video::EMF_LIGHTING, false);
    bill->setMaterialFlag(video::EMF_ZWRITE_ENABLE, false);
    bill->setMaterialType(video::EMT_TRANSPARENT_ADD_COLOR);
    bill->setMaterialTexture(0, driver->getTexture("../../media/particlegreen.jpg"));
Now the same again, with the second light. The difference is that we add a particle system to it too. And because the light moves, the particles of the particlesystem will follow. If you want to know more about how particle systems are created in Irrlicht, take a look at the specialFx example. Maybe you will have noticed that we only add 2 lights, this has a simple reason: The low end version of this material was written in ps1.1 and vs1.1, which doesn't allow more lights. You could add a third light to the scene, but it won't be used to shade the walls. But of course, this will change in future versions of Irrlicht where higher versions of pixel/vertex shaders will be implemented too.
    // add light 2 (red)
    scene::ISceneNode* light2 =
        smgr->addLightSceneNode(0, core::vector3df(0,0,0),
        video::SColorf(1.0f, 0.2f, 0.2f, 0.0f), 800.0f);

    // add fly circle animator to light 2
    anim = smgr->createFlyCircleAnimator(core::vector3df(0,150,0), 200.0f,
            0.001f, core::vector3df(0.2f, 0.9f, 0.f));
    light2->addAnimator(anim);
    anim->drop();

    // attach billboard to light
    bill = smgr->addBillboardSceneNode(light2, core::dimension2d<f32>(120, 120));
    bill->setMaterialFlag(video::EMF_LIGHTING, false);
    bill->setMaterialFlag(video::EMF_ZWRITE_ENABLE, false);
    bill->setMaterialType(video::EMT_TRANSPARENT_ADD_COLOR);
    bill->setMaterialTexture(0, driver->getTexture("../../media/particlered.bmp"));

    // add particle system
    scene::IParticleSystemSceneNode* ps =
        smgr->addParticleSystemSceneNode(false, light2);

    // create and set emitter
    scene::IParticleEmitter* em = ps->createBoxEmitter(
        core::aabbox3d<f32>(-3,0,-3,3,1,3),
        core::vector3df(0.0f,0.03f,0.0f),
        80,100,
        video::SColor(10,255,255,255), video::SColor(10,255,255,255),
        400,1100);
    em->setMinStartSize(core::dimension2d<f32>(30.0f, 40.0f));
    em->setMaxStartSize(core::dimension2d<f32>(30.0f, 40.0f));

    ps->setEmitter(em);
    em->drop();

    // create and set affector
    scene::IParticleAffector* paf = ps->createFadeOutParticleAffector();
    ps->addAffector(paf);
    paf->drop();

    // adjust some material settings
    ps->setMaterialFlag(video::EMF_LIGHTING, false);
    ps->setMaterialFlag(video::EMF_ZWRITE_ENABLE, false);
    ps->setMaterialTexture(0, driver->getTexture("../../media/fireball.bmp"));
    ps->setMaterialType(video::EMT_TRANSPARENT_ADD_COLOR);

    MyEventReceiver receiver(room, earth, env, driver);
    device->setEventReceiver(&receiver);
Finally, draw everything. That's it.
    int lastFPS = -1;

    while(device->run())
    if (device->isWindowActive())
    {
        driver->beginScene(true, true, 0);

        smgr->drawAll();
        env->drawAll();

        driver->endScene();

        int fps = driver->getFPS();

        if (lastFPS != fps)
        {
            core::stringw str = L"Per pixel lighting example - Irrlicht Engine [";
            str += driver->getName();
            str += "] FPS:";
            str += fps;

            device->setWindowCaption(str.c_str());
            lastFPS = fps;
        }
    }

    device->drop();

    return 0;
}