 |
Irrlicht 3D Engine
|


|
|
Irrlicht 3D Engine
|
|
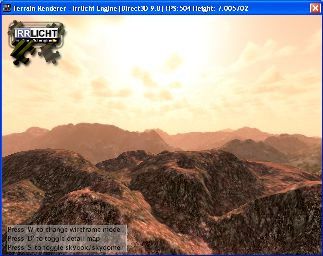
This tutorial will briefly show how to use the terrain renderer of Irrlicht. It will also show the terrain renderer triangle selector to be able to do collision detection with terrain.
Note that the Terrain Renderer in Irrlicht is based on Spintz' GeoMipMapSceneNode, lots of thanks go to him. DeusXL provided a new elegant simple solution for building larger area on small heightmaps -> terrain smoothing.
In the beginning there is nothing special. We include the needed header files and create an event listener to listen if the user presses a key: The 'W' key switches to wireframe mode, the 'P' key to pointcloud mode, and the 'D' key toggles between solid and detail mapped material.
#include <irrlicht.h>
#include "driverChoice.h"

using namespace irr;

#ifdef _MSC_VER
#pragma comment(lib, "Irrlicht.lib")
#endif


class MyEventReceiver : public IEventReceiver
{
public:

    MyEventReceiver(scene::ISceneNode* terrain, scene::ISceneNode* skybox, scene::ISceneNode* skydome) :
        Terrain(terrain), Skybox(skybox), Skydome(skydome), showBox(true), showDebug(false)
    {
        Skybox->setVisible(showBox);
        Skydome->setVisible(!showBox);
    }

    bool OnEvent(const SEvent& event)
    {
        // check if user presses the key 'W' or 'D'
        if (event.EventType == irr::EET_KEY_INPUT_EVENT && !event.KeyInput.PressedDown)
        {
            switch (event.KeyInput.Key)
            {
            case irr::KEY_KEY_W: // switch wire frame mode
                Terrain->setMaterialFlag(video::EMF_WIREFRAME,
                        !Terrain->getMaterial(0).Wireframe);
                Terrain->setMaterialFlag(video::EMF_POINTCLOUD, false);
                return true;
            case irr::KEY_KEY_P: // switch wire frame mode
                Terrain->setMaterialFlag(video::EMF_POINTCLOUD,
                        !Terrain->getMaterial(0).PointCloud);
                Terrain->setMaterialFlag(video::EMF_WIREFRAME, false);
                return true;
            case irr::KEY_KEY_D: // toggle detail map
                Terrain->setMaterialType(
                    Terrain->getMaterial(0).MaterialType == video::EMT_SOLID ?
                    video::EMT_DETAIL_MAP : video::EMT_SOLID);
                return true;
            case irr::KEY_KEY_S: // toggle skies
                showBox=!showBox;
                Skybox->setVisible(showBox);
                Skydome->setVisible(!showBox);
                return true;
            case irr::KEY_KEY_X: // toggle debug information
                showDebug=!showDebug;
                Terrain->setDebugDataVisible(showDebug?scene::EDS_BBOX_ALL:scene::EDS_OFF);
                return true;
            default:
                break;
            }
        }

        return false;
    }

private:
    scene::ISceneNode* Terrain;
    scene::ISceneNode* Skybox;
    scene::ISceneNode* Skydome;
    bool showBox;
    bool showDebug;
};
The start of the main function starts like in most other example. We ask the user for the desired renderer and start it up. This time with the advanced parameter handling.
int main()
{
    // ask user for driver
    video::E_DRIVER_TYPE driverType=driverChoiceConsole();
    if (driverType==video::EDT_COUNT)
        return 1;

    // create device with full flexibility over creation parameters
    // you can add more parameters if desired, check irr::SIrrlichtCreationParameters
    irr::SIrrlichtCreationParameters params;
    params.DriverType=driverType;
    params.WindowSize=core::dimension2d<u32>(640, 480);
    IrrlichtDevice* device = createDeviceEx(params);

    if (device == 0)
        return 1; // could not create selected driver.
First, we add standard stuff to the scene: A nice irrlicht engine logo, a small help text, a user controlled camera, and we disable the mouse cursor.
    video::IVideoDriver* driver = device->getVideoDriver();
    scene::ISceneManager* smgr = device->getSceneManager();
    gui::IGUIEnvironment* env = device->getGUIEnvironment();

    driver->setTextureCreationFlag(video::ETCF_ALWAYS_32_BIT, true);

    // add irrlicht logo
    env->addImage(driver->getTexture("../../media/irrlichtlogo2.png"),
        core::position2d<s32>(10,10));

    //set other font
    env->getSkin()->setFont(env->getFont("../../media/fontlucida.png"));

    // add some help text
    env->addStaticText(
        L"Press 'W' to change wireframe mode\nPress 'D' to toggle detail map\nPress 'S' to toggle skybox/skydome",
        core::rect<s32>(10,421,250,475), true, true, 0, -1, true);

    // add camera
    scene::ICameraSceneNode* camera =
        smgr->addCameraSceneNodeFPS(0,100.0f,1.2f);

    camera->setPosition(core::vector3df(2700*2,255*2,2600*2));
    camera->setTarget(core::vector3df(2397*2,343*2,2700*2));
    camera->setFarValue(42000.0f);

    // disable mouse cursor
    device->getCursorControl()->setVisible(false);
Here comes the terrain renderer scene node: We add it just like any other scene node to the scene using ISceneManager::addTerrainSceneNode(). The only parameter we use is a file name to the heightmap we use. A heightmap is simply a gray scale texture. The terrain renderer loads it and creates the 3D terrain from it.
To make the terrain look more big, we change the scale factor of it to (40, 4.4, 40). Because we don't have any dynamic lights in the scene, we switch off the lighting, and we set the file terrain-texture.jpg as texture for the terrain and detailmap3.jpg as second texture, called detail map. At last, we set the scale values for the texture: The first texture will be repeated only one time over the whole terrain, and the second one (detail map) 20 times.
    // add terrain scene node
    scene::ITerrainSceneNode* terrain = smgr->addTerrainSceneNode(
        "../../media/terrain-heightmap.bmp",
        0,                  // parent node
        -1,                 // node id
        core::vector3df(0.f, 0.f, 0.f),     // position
        core::vector3df(0.f, 0.f, 0.f),     // rotation
        core::vector3df(40.f, 4.4f, 40.f),  // scale
        video::SColor ( 255, 255, 255, 255 ),   // vertexColor
        5,                  // maxLOD
        scene::ETPS_17,             // patchSize
        4                   // smoothFactor
        );

    terrain->setMaterialFlag(video::EMF_LIGHTING, false);

    terrain->setMaterialTexture(0,
            driver->getTexture("../../media/terrain-texture.jpg"));
    terrain->setMaterialTexture(1,
            driver->getTexture("../../media/detailmap3.jpg"));

    terrain->setMaterialType(video::EMT_DETAIL_MAP);

    terrain->scaleTexture(1.0f, 20.0f);
To be able to do collision with the terrain, we create a triangle selector. If you want to know what triangle selectors do, just take a look into the collision tutorial. The terrain triangle selector works together with the terrain. To demonstrate this, we create a collision response animator and attach it to the camera, so that the camera will not be able to fly through the terrain.
    // create triangle selector for the terrain
    scene::ITriangleSelector* selector
        = smgr->createTerrainTriangleSelector(terrain, 0);
    terrain->setTriangleSelector(selector);

    // create collision response animator and attach it to the camera
    scene::ISceneNodeAnimator* anim = smgr->createCollisionResponseAnimator(
        selector, camera, core::vector3df(60,100,60),
        core::vector3df(0,0,0),
        core::vector3df(0,50,0));
    selector->drop();
    camera->addAnimator(anim);
    anim->drop();
If you need access to the terrain data you can also do this directly via the following code fragment.
    scene::CDynamicMeshBuffer* buffer = new scene::CDynamicMeshBuffer(video::EVT_2TCOORDS, video::EIT_16BIT);
    terrain->getMeshBufferForLOD(*buffer, 0);
    video::S3DVertex2TCoords* data = (video::S3DVertex2TCoords*)buffer->getVertexBuffer().getData();
    // Work on data or get the IndexBuffer with a similar call.
    buffer->drop(); // When done drop the buffer again.
To make the user be able to switch between normal and wireframe mode, we create an instance of the event receiver from above and let Irrlicht know about it. In addition, we add the skybox which we already used in lots of Irrlicht examples and a skydome, which is shown mutually exclusive with the skybox by pressing 'S'.
    // create skybox and skydome
    driver->setTextureCreationFlag(video::ETCF_CREATE_MIP_MAPS, false);

    scene::ISceneNode* skybox=smgr->addSkyBoxSceneNode(
        driver->getTexture("../../media/irrlicht2_up.jpg"),
        driver->getTexture("../../media/irrlicht2_dn.jpg"),
        driver->getTexture("../../media/irrlicht2_lf.jpg"),
        driver->getTexture("../../media/irrlicht2_rt.jpg"),
        driver->getTexture("../../media/irrlicht2_ft.jpg"),
        driver->getTexture("../../media/irrlicht2_bk.jpg"));
    scene::ISceneNode* skydome=smgr->addSkyDomeSceneNode(driver->getTexture("../../media/skydome.jpg"),16,8,0.95f,2.0f);

    driver->setTextureCreationFlag(video::ETCF_CREATE_MIP_MAPS, true);

    // create event receiver
    MyEventReceiver receiver(terrain, skybox, skydome);
    device->setEventReceiver(&receiver);
That's it, draw everything.
    int lastFPS = -1;

    while(device->run())
    if (device->isWindowActive())
    {
        driver->beginScene(true, true, 0 );

        smgr->drawAll();
        env->drawAll();

        driver->endScene();

        // display frames per second in window title
        int fps = driver->getFPS();
        if (lastFPS != fps)
        {
            core::stringw str = L"Terrain Renderer - Irrlicht Engine [";
            str += driver->getName();
            str += "] FPS:";
            str += fps;
            // Also print terrain height of current camera position
            // We can use camera position because terrain is located at coordinate origin
            str += " Height: ";
            str += terrain->getHeight(camera->getAbsolutePosition().X,
                    camera->getAbsolutePosition().Z);

            device->setWindowCaption(str.c_str());
            lastFPS = fps;
        }
    }

    device->drop();

    return 0;
}
Now you know how to use terrain in Irrlicht.