 |
Irrlicht 3D Engine
|


|
|
Irrlicht 3D Engine
|
|
A tutorial by Max Winkel.
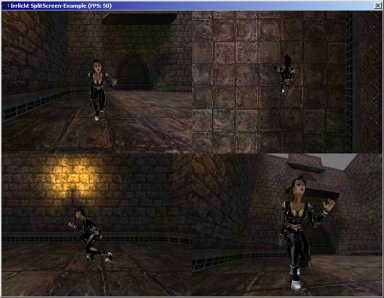
In this tutorial we'll learn how to use splitscreen (e.g. for racing-games) with Irrlicht. We'll create a viewport divided into 4 parts, with 3 fixed cameras and one user-controlled.
Ok, let's start with the headers (I think there's nothing to say about it)
#include <irrlicht.h>
#include "driverChoice.h"

#ifdef _MSC_VER
#pragma comment(lib, "Irrlicht.lib")
#endif

//Namespaces for the engine
using namespace irr;
using namespace core;
using namespace video;
using namespace scene;
Now we'll define the resolution in a constant for use in initializing the device and setting up the viewport. In addition we set up a global variable saying splitscreen is active or not.
//Resolution
const int ResX=800;
const int ResY=600;
const bool fullScreen=false;

//Use SplitScreen?
bool SplitScreen=true;
Now we need four pointers to our cameras which are created later:
//cameras
ICameraSceneNode *camera[4]={0,0,0,0};
In our event-receiver we switch the SplitScreen-variable, whenever the user press the S-key. All other events are sent to the FPS camera.
class MyEventReceiver : public IEventReceiver
{
    public:
        virtual bool OnEvent(const SEvent& event)
        {
            //Key S enables/disables SplitScreen
            if (event.EventType == irr::EET_KEY_INPUT_EVENT &&
                event.KeyInput.Key == KEY_KEY_S && event.KeyInput.PressedDown)
            {
                SplitScreen = !SplitScreen;
                return true;
            }
            //Send all other events to camera4
            if (camera[3])
                return camera[3]->OnEvent(event);
            return false;
        }
};
Ok, now the main-function: First, we initialize the device, get the SourceManager and VideoDriver, load an animated mesh from .md2 and a map from .pk3. Because that's old stuff, I won't explain every step. Just take care of the maps position.
int main()
{
    // ask user for driver
    video::E_DRIVER_TYPE driverType=driverChoiceConsole();
    if (driverType==video::EDT_COUNT)
        return 1;

    //Instance of the EventReceiver
    MyEventReceiver receiver;

    //Initialise the engine
    IrrlichtDevice *device = createDevice(driverType,
            dimension2du(ResX,ResY), 32, fullScreen,
            false, false, &receiver);
    if (!device)
        return 1;

    ISceneManager *smgr = device->getSceneManager();
    IVideoDriver *driver = device->getVideoDriver();

    //Load model
    IAnimatedMesh *model = smgr->getMesh("../../media/sydney.md2");
    if (!model)
        return 1;
    IAnimatedMeshSceneNode *model_node = smgr->addAnimatedMeshSceneNode(model);
    //Load texture
    if (model_node)
    {
        ITexture *texture = driver->getTexture("../../media/sydney.bmp");
        model_node->setMaterialTexture(0,texture);
        model_node->setMD2Animation(scene::EMAT_RUN);
        //Disable lighting (we've got no light)
        model_node->setMaterialFlag(EMF_LIGHTING,false);
    }

    //Load map
    device->getFileSystem()->addFileArchive("../../media/map-20kdm2.pk3");
    IAnimatedMesh *map = smgr->getMesh("20kdm2.bsp");
    if (map)
    {
        ISceneNode *map_node = smgr->addOctreeSceneNode(map->getMesh(0));
        //Set position
        map_node->setPosition(vector3df(-850,-220,-850));
    }
Now we create our four cameras. One is looking at the model from the front, one from the top and one from the side. In addition there's a FPS-camera which can be controlled by the user.
    // Create 3 fixed and one user-controlled cameras
    //Front
    camera[0] = smgr->addCameraSceneNode(0, vector3df(50,0,0), vector3df(0,0,0));
    //Top
    camera[1] = smgr->addCameraSceneNode(0, vector3df(0,50,0), vector3df(0,0,0));
    //Left
    camera[2] = smgr->addCameraSceneNode(0, vector3df(0,0,50), vector3df(0,0,0));
    //User-controlled
    camera[3] = smgr->addCameraSceneNodeFPS();
    // don't start at sydney's position
    if (camera[3])
        camera[3]->setPosition(core::vector3df(-50,0,-50));
Create a variable for counting the fps and hide the mouse:
    //Hide mouse
    device->getCursorControl()->setVisible(false);
    //We want to count the fps
    int lastFPS = -1;
There wasn't much new stuff - till now! Only by defining four cameras, the game won't be splitscreen. To do this you need several steps:
Sounds a little complicated, but you'll see it isn't:
    while(device->run())
    {
        //Set the viewpoint to the whole screen and begin scene
        driver->setViewPort(rect<s32>(0,0,ResX,ResY));
        driver->beginScene(true,true,SColor(255,100,100,100));
        //If SplitScreen is used
        if (SplitScreen)
        {
            //Activate camera1
            smgr->setActiveCamera(camera[0]);
            //Set viewpoint to the first quarter (left top)
            driver->setViewPort(rect<s32>(0,0,ResX/2,ResY/2));
            //Draw scene
            smgr->drawAll();
            //Activate camera2
            smgr->setActiveCamera(camera[1]);
            //Set viewpoint to the second quarter (right top)
            driver->setViewPort(rect<s32>(ResX/2,0,ResX,ResY/2));
            //Draw scene
            smgr->drawAll();
            //Activate camera3
            smgr->setActiveCamera(camera[2]);
            //Set viewpoint to the third quarter (left bottom)
            driver->setViewPort(rect<s32>(0,ResY/2,ResX/2,ResY));
            //Draw scene
            smgr->drawAll();
            //Set viewport the last quarter (right bottom)
            driver->setViewPort(rect<s32>(ResX/2,ResY/2,ResX,ResY));
        }
        //Activate camera4
        smgr->setActiveCamera(camera[3]);
        //Draw scene
        smgr->drawAll();
        driver->endScene();
As you can probably see, the image is rendered for every viewport separately. That means, that you'll loose much performance. Ok, if you're asking "How do I have to set the viewport to get this or that screen?", don't panic. It's really easy: In the rect-function you define 4 coordinates:
That means, if you want to split the screen into 2 viewports you would give the following coordinates:
If you didn't fully understand, just play around with the example to check out what happens.
Now we just view the current fps and shut down the engine, when the user wants to:
        //Get and show fps
        if (driver->getFPS() != lastFPS)
        {
            lastFPS = driver->getFPS();
            core::stringw tmp = L"Irrlicht SplitScreen-Example (FPS: ";
            tmp += lastFPS;
            tmp += ")";
            device->setWindowCaption(tmp.c_str());
        }
    }
    //Delete device
    device->drop();
    return 0;
}
That's it! Just compile and play around with the program. Note: With the S-Key you can switch between using splitscreen and not.