Ageia PhysX Tutorials (cloth, grass, ragdoll, etc.)

Post your questions, suggestions and experiences regarding game design, integration of external libraries here. For irrEdit, irrXML and irrKlang, see the
ambiera forums
veegun
Posts: 59
Joined: Mon May 29, 2006 1:58 am

Ageia PhysX Tutorials (cloth, grass, ragdoll, etc.)

Post by veegun »

Maybe this will help people determine how hard/good/feasibility the Ageia's PhysX API really is by seeing the first tutorial.

Personally, the demo with the clothes being ripped apart sold me (clothes start ripping after 1:23 into the video below):

http://www.youtube.com/watch?v=fXkSxph75_I

yet another one with clothes:

http://www.youtube.com/watch?v=dviWZcphcIQ

I haven't seen any other physics API able to rip clothes! :)

(source: http://devsupport.ageia.com/ics/support ... tionID=243)

Lesson 001: Quick Start Integration Guide

Introduction

This is a Quick Start Guide to integrating PhysX into your game. It contains a basic PhysX shell that highlights the key components to a quick-start PhysX integration. It will help you avoid some of the common initial developer pitfalls with integration.

1 Basic PhysX Shell
2 Make your Physics Loop Asynchronous
3 Use a Fixed Timestep
4 Turn on Debug Rendering
5 Put your User Callbacks and Inputs in ProcessInputs()
6 Adjust your Physics Parameters to Scale
7 Render your Physics Objects

1 Basic PhysX Shell

The following is a basic PhysX shell with an asynchronous physics loop, fixed timestep, debug rendering turned on, callbacks in ProcessInputs() after NxScene::fetchResults() and before NxScene::gScene->simulate(), physics parameters adjusted to scale, and objects drawn in sync with their physical data. We will analyze this basic loop in the next sections to explain where each item of interest is and how it works. For reference, this shell is built on an OpenGL implementation.

Code: Select all


NxPhysicsSDK* gPhysicsSDK = NULL;
NxScene*      gScene      = NULL;

void RenderCallback()
{
    . . .
    // Update physics objects
    if (gScene)
    {
        GetPhysicsResults();
        ProcessInputs();
        StartPhysics();
    }

    // Render physics objects
    SetupCamera();
    RenderActors();
    . . .
}

void GetPhysicsResults()
{
    // Get results from gScene->simulate(deltaTime)
    while (!gScene->fetchResults(NX_RIGID_BODY_FINISHED, false));
}

void ProcessInputs()
{
    // Put user callbacks here

    // Show debug wireframes
    if (bDebugWireframeMode)
    {
        if (gScene)  gDebugRenderer.renderData(*gScene->getDebugRenderable());
    }
}

void StartPhysics()
{
    // Update the time step
    NxReal deltaTime = 1.0f/60.0f;

    // Start collision and dynamics for delta time since the last frame
    gScene->simulate(deltaTime);
    gScene->flushStream();
}

void InitNx()
{
    // Create the physics SDK
    gPhysicsSDK = NxCreatePhysicsSDK(NX_PHYSICS_SDK_VERSION);
    if (!gPhysicsSDK)  return;

    // Set the debug visualization parameters
    gPhysicsSDK->setParameter(NX_VISUALIZATION_SCALE, 1);
    gPhysicsSDK->setParameter(NX_VISUALIZE_COLLISION_SHAPES, 1);
    gPhysicsSDK->setParameter(NX_VISUALIZE_ACTOR_AXES, 1);

    // Set scale dependent parameters
    NxReal scale = 1.0f;   // scale is meters per PhysX units

    gPhysicsSDK->setParameter(NX_SKIN_WIDTH, 0.05*(1/scale));
    gPhysicsSDK->setParameter(NX_DEFAULT_SLEEP_LIN_VEL_SQUARED, 0.15*0.15*(1/scale)*(1/scale));
    gPhysicsSDK->setParameter(NX_BOUNCE_THRESHOLD, -2*(1/ scale));
    gPhysicsSDK->setParameter(NX_VISUALIZATION_SCALE, 0.5*(1/ scale));

    // Initialize the physics loop
    if (gScene)  StartPhysics();
}

void DebugRenderer::renderData(const NxDebugRenderable& data) const
{
    . . .
}

2 Make your Physics Loop Asynchronous

To take full advantage of multi-threading, make your physics loop asynchronous. Set up your physics loop like this in your render callback.

Code: Select all


void RenderCallback()
{
    GetPhysicsResults();
    ProcessInputs();
    StartPhysics();
}

This ensures the physics simulation will be running in parallel with the rest of your game code.

Code: Select all


void ProcessInputs()
{
    // Put user callbacks here

    // Show debug wireframes
    if (bDebugWireframeMode)
    {
        if (gScene)  gDebugRenderer.renderData(*gScene->getDebugRenderable());
    }
}

3 Use a Fixed Time Step

When starting out, make sure to use a fixed time step for your physics loop. You can synchronize your physics update with your graphics update later, this will get you up and running right away.

Code: Select all


void StartPhysics()
{
    // Update the time step
    NxReal deltaTime = 1.0f/60.0f;    // Start collision and dynamics for delta time since the last frame
    gScene->simulate(deltaTime);
    gScene->flushStream();
} 

4 Turn on Debug Rendering

Set up debug rendering immediately so you can visualize the PhysX objects you create. You will need to create a debug renderer object:

Code: Select all


class DebugRenderer
{
public:
    void renderData(const NxDebugRenderable& data) const;
};

Attach add some simple debug visualization flags to the SDK, like collision shapes and actor axes. You will need to set the visualization scale to something non-zero (like 1) to turn the visualization lines on.

Code: Select all


void InitNx()
{
    // Create the physics SDK
    gPhysicsSDK = NxCreatePhysicsSDK(NX_PHYSICS_SDK_VERSION);
    if (!gPhysicsSDK)  return;
    . . .
    // Set the debug visualization parameters
    gPhysicsSDK->setParameter(NX_VISUALIZATION_SCALE, 1);
    gPhysicsSDK->setParameter(NX_VISUALIZE_COLLISION_SHAPES, 1);
    gPhysicsSDK->setParameter(NX_VISUALIZE_ACTOR_AXES, 1);
    . . .
}

Put the following lines of code in your ProcessInputs() function. This will help you to immediately visualize your objects:

Code: Select all


void ProcessInputs()
{
    // Put user callbacks and inputs here

    // Show debug wireframes
    if (bDebugWireframeMode)
    {
        if (gScene)  gDebugRenderer.renderData(*gScene->getDebugRenderable());
    }
}

5 Put your User Callbacks and Inputs in ProcessInputs()

The debug renderer object needs to be passed to the SDK in the ProcessInputs() function in between GetPhysicsResults() (NxScene::fetchResults()) and StartPhysics() (NxScene::simulate()).

Any other user callbacks or user inputs to the scene you need to do here, as input to the scene is locked out in the rest of the code.

Code: Select all


void RenderCallback()
{
    GetPhysicsResults();
    ProcessInputs();
    StartPhysics();
}

void ProcessInputs()
{
    // Put user callbacks and inputs here

    // Show debug wireframes
    if (bDebugWireframeMode)
    {
        if (gScene)  gDebugRenderer.renderData(*gScene->getDebugRenderable());
    }
}

6 Adjust your Physics Parameters to Scale

One of the most common problems encountered by developers is the issue of scale. There are five parameters PhysX uses that have absolute scale: min separation for penalty, sleep linear velocity, bounce threshold, and visualization scale.

You will want to adjust these so they make sense within the scale of your game world. If your object scale is scale meters / PhysX unit, you will want to set these like this

Code: Select all


NxReal scale = 1.0f;   // scale is meters per PhysX units

gPhysicsSDK->setParameter(NX_SKIN_WIDTH, 0.05*(1/ scale));
gPhysicsSDK->setParameter(NX_DEFAULT_SLEEP_LIN_VEL_SQUARED, 0.15*0.15*(1/ scale)*(1/ scale));
gPhysicsSDK->setParameter(NX_BOUNCE_THRESHOLD, -2*(1/ scale));
gPhysicsSDK->setParameter(NX_VISUALIZATION_SCALE, 0.5*(1/ scale));

7 Render your Physics Objects

You should now be able to see your objects via debug rendering. Now you want to use your own rendering routines to draw them. The following SetupCamera() and RenderActors() functions cycles through PhysX actors and renders their shapes using OpenGL. This example only renders sphere shapes.

Code: Select all


void RenderCallback()
{
…
    // Render your physics objects
    SetupCamera();
    RenderActors();
}

float gCameraAspectRatio = 1.0f;
NxVec3 gCameraPos(0,5,-15);
NxVec3 gCameraForward(0,0,1);

void SetupCamera()
{
    // Setup camera
    glMatrixMode(GL_PROJECTION);
    glLoadIdentity();
    gluPerspective(60.0f, gCameraAspectRatio, 1.0f, 10000.0f);
    gluLookAt(gCameraPos.x,gCameraPos.y,gCameraPos.z,gCameraPos.x + gCameraForward.x, gCameraPos.y + gCameraForward.y, gCameraPos.z + gCameraForward.z, 0.0f, 1.0f, 0.0f);

    glMatrixMode(GL_MODELVIEW);
    glLoadIdentity();
}

void RenderActors()
{
    // Render all the actors in the scene
    int nbActors = gScene->getNbActors();
    NxActor** actors = gScene->getActors();
    while (nbActors--)
    {
        NxActor* actor = *actors++;
        DrawActor(actor);
    }
}

void DrawActor(NxActor* actor)
{
    NxShape** shapes = actor->getShapes();
    NxU32 nShapes = actor->getNbShapes();
    nShapes = actor->getNbShapes();
    while (nShapes--)
    {
        DrawShape(shapes[nShapes]);
    }
}

void DrawShape(NxShape* shape)
{
    switch(shape->getType())
    {
        . . .
        case NX_SHAPE_SPHERE:
            DrawSphere(shape);
        break;
        . . .
    }
}

int dispListSphere;

void InitShapeDisplayLists()
{
    // SPHERE DISPLAY LIST
    dispListSphere = glGenLists(1);
    glNewList(dispListSphere, GL_COMPILE);      
    GLUquadricObj * quadObj = gluNewQuadric ();
    gluQuadricDrawStyle (quadObj, GLU_FILL);
    gluQuadricNormals (quadObj, GLU_SMOOTH); 
    gluQuadricOrientation(quadObj,GLU_OUTSIDE);
    gluSphere (quadObj, 1.0f, 9, 7); //unit sphere
    glEndList();
    gluDeleteQuadric(quadObj);
}

void DrawSphere(NxShape *sphere)
{
    NxMat34 pose = sphere->getGlobalPose();

    glPushMatrix();
    SetupGLMatrix(pose.t, pose.M);
    NxReal r = sphere->isSphere()->getRadius();
    glScaled(r,r,r);
    glCallList(dispListSphere);
    glPopMatrix();
}

void SetupGLMatrix(const NxVec3& pos, const NxMat33& orient)
{
    float glmat[16]; //4x4 column major matrix for OpenGL.
    orient.getColumnMajorStride4(&(glmat[0]));
    pos.get(&(glmat[12]));

    //clear the elements we don't need:
    glmat[3] = glmat[7] = glmat[11] = 0.0f;
    glmat[15] = 1.0f;

    glMultMatrixf(&(glmat[0]));
}

The key code is the setupGLMatrix() call in DrawSphere where we build an OpenGL transformation matrix from a PhysX shape transformation matrix. This turns a PhysX shape positioning matrix into a graphical display matrix for your object. Check this against the debug rendering of your objects to make sure your object rendering is correct.

8 Conclusion

This has been a Quick-Start guide to PhysX.

If you have any questions or comments about this guide, please click "Discuss Topic" to the right of this article.
Last edited by veegun on Sat Dec 09, 2006 3:40 pm, edited 1 time in total.
veegun
Posts: 59
Joined: Mon May 29, 2006 1:58 am

Lesson 408: Grass

Post by veegun »

Image

1 Introduction

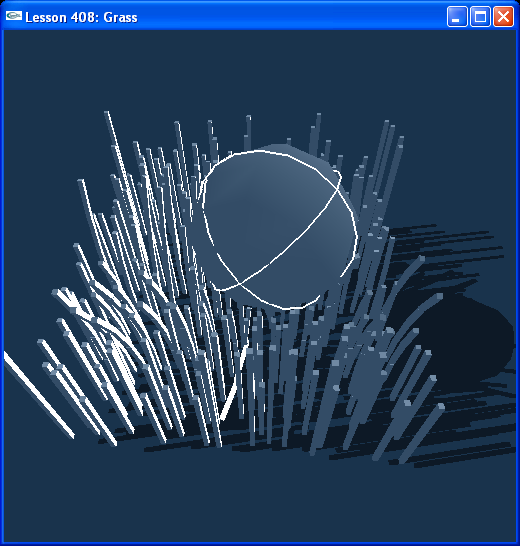
This is a lesson on how to create grass. Much like rope, a blade of grass is a line of rigid bodies linked together by spherical joints. Making the joint with a limit and a spring helps define an object that tries to restore its original position.


2 Grass

We have a class Blade that we make our blades of grass from.

Code: Select all


class Blade
{
public:
    Blade(const NxVec3& pos, const NxReal height, const NxU32 numJoints)
    {
        NxReal partHeight = height / (NxReal)numJoints;
        NxReal radius = 0.1;
        NxVec3 globalAnchor;

        bladeSegs = new NxActor*[numJoints];
        bladeLinks = new NxSphericalJoint*[numJoints];

        NxU32 i;
        for (i = 0; i < numJoints; i++)
        {
            bladeSegs[i] = CreateBlade(pos+NxVec3(0, partHeight/2+radius+ (partHeight+radius*2)*I , 0), NxVec3(radius/2,(partHeight+2*radius)/2,radius/2), numJoints-i+1);
            bladeSegs[i]->setLinearDamping(10);
            SetActorGroup(bladeSegs[i],1);
        }

        // Anchor blade to ground
        globalAnchor = bladeSegs[0]->getCMassGlobalPosition() - NxVec3(0, partHeight/2, 0);
        bladeLinks[0] = CreateBladeLink(bladeSegs[0],NULL,globalAnchor, NxVec3(0,1,0));

        for (i = 1; i < numJoints; i++)
        {
            globalAnchor = bladeSegs[i]->getCMassGlobalPosition() - NxVec3(0,partHeight/2,0);
            bladeLinks[i] = CreateBladeLink(bladeSegs[i], bladeSegs[i-1], globalAnchor, NxVec3(0,1,0));
        }
    }

    NxActor** bladeSegs;
    NxSphericalJoint** bladeLinks;
};

The segments of the blade are box shapes and the links are spherical joints created in CreateBladeLink() in Joints.cpp.

Code: Select all


NxSphericalJoint* CreateBladeLink(NxActor* a0, NxActor* a1, const NxVec3& globalAnchor, const NxVec3& globalAxis)
{
    NxSphericalJointDesc sphericalDesc;
    sphericalDesc.actor[0] = a0;
    sphericalDesc.actor[1] = a1;
    sphericalDesc.setGlobalAnchor(globalAnchor);
    sphericalDesc.setGlobalAxis(globalAxis);

    sphericalDesc.flags |= NX_SJF_SWING_LIMIT_ENABLED;
    sphericalDesc.swingLimit.value = (NxReal)0.05*NxPi;
    sphericalDesc.swingLimit.restitution = 0.75;
    sphericalDesc.swingLimit.hardness = 0.5;

    sphericalDesc.flags |= NX_SJF_SWING_SPRING_ENABLED;
    sphericalDesc.swingSpring.spring = 0.75;
    sphericalDesc.swingSpring.damper = 1;
 
    sphericalDesc.flags |= NX_SJF_TWIST_LIMIT_ENABLED;
    sphericalDesc.twistLimit.low.value = -(NxReal)0.05*NxPi;
    sphericalDesc.twistLimit.low.restitution = 0.75;
    sphericalDesc.twistLimit.low.hardness = 0.5;
    sphericalDesc.twistLimit.high.value = (NxReal)0.05*NxPi;
    sphericalDesc.twistLimit.high.restitution = 0.75;
    sphericalDesc.twistLimit.high.hardness = 0.5;

    sphericalDesc.flags |= NX_SJF_TWIST_SPRING_ENABLED;
    sphericalDesc.twistSpring.spring = 0.75;
    sphericalDesc.twistSpring.damper = 1;

    return (NxSphericalJoint*)gScene->createJoint(sphericalDesc);
}

Each blade is attached to the ground by the same link.

3 Conclusion

This ends the lessons built from the PSCL scripts used in Rocket. Grass, trees, and other sorts of bendy vegetation can be built using the SDK.
Last edited by veegun on Sat Dec 09, 2006 3:48 pm, edited 1 time in total.
veegun
Posts: 59
Joined: Mon May 29, 2006 1:58 am

Lesson 411: Fragmenting Objects (explosion!)

Post by veegun »

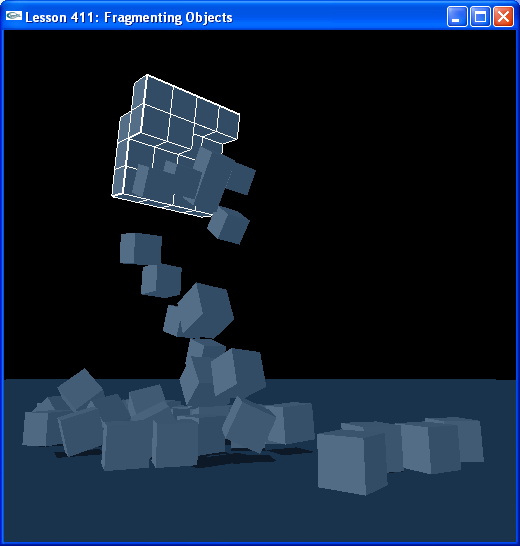
Lesson 411: Fragmenting Objects

Image

1 Introduction

In many games, you want to create destructible objects that break apart or explode into component and/or prefractured pieces. In this lesson we show how to construct an actor from pieces, the actor's shapes conforming to the pieces, then disengage the shapes from the main actor and building them into their own autonomous actors.

2 Creating the Cube of Cubes

We create a cube out of many smaller cubes, and then break off cubes one at a time to fragment the larger object.

In InitNx(), we call CreateMainObject().

This function loops through the cubes that will form the large, final cube. The number of cubes is specified by the cube of the global iNumBoxesOnSide, at the top of Lesson313.cpp.

The line:

Code: Select all


 boxDesc[ iCurrentIndex ].localPose.t.set( NxVec3( ((i-1) * fCubeSide * 2.0f), ((j-1) * fCubeSide * 2.0f), ((k-1) * fCubeSide * 2.0f)));

sets the local pose of each sub-cube so that they fit together to make a large cube of cubes. Each of these shapes is then pushed onto the array of shapes in actorDesc.

3 Breaking off a Cube

When you hit “g”, ReleaseRandomShape() is called. First, we check the number of shapes in our actor with:

Code: Select all


 NxU32 uiNumShapes = mainBox->getNbShapes();

and get the array of pointers to those shapes with:

Code: Select all


 NxShape** ppShapeArray = mainBox->getShapes();

You don't want to remove a shape if there is only one left, as that will leave you with a shape-less actor. We now record the global pose of the shape we are removing, so we can use it as the starting position of the new shape. You release a shape with:

Code: Select all


 mainBox->releaseShape( *pShapeToRelease );

where mainBox is your actor pointer, and pShapeToRelease is a pointer to a valid shape (in that actor) that you want to release. Here, we choose the first shape in the array ppShapeArray, but you might want to base it on other information (such as a contact point with a pointer to a shape). Now that the shape is released, it is important to call:

Code: Select all


 mainBox->updateMassFromShapes(fBoxDensity, 0.0f );

in order to recalculate the mass and inertial tensor for the object. You can either pass this function a density with the mass 0.0f, or the density 0.0f with a total mass. Rather than calculate the new mass ourselves, we just send the density (which is the same for every cube in our compound).

Finally, we create a new, simple box with the same dimensions and global pose as the shape we just released. You might consider giving it the same linear and angular velocity of the larger object, or a seperating velocity, but in this demo it starts with zero velocity.

4 Maintaining “Hidden” Kinematic Piece Actors to Avoid Recalculating the Broad Phase

You will get a performance hit the more actors you add to the scene collision geometry on any given frame. This is because you are inserting new elements to be considered for collision, and the broad phase of collision detection has to sort these elements into arrays of potentially colliding objects.

You can see the potential hazard for this in this lesson and the next. In this lesson, we see the potential for spawn multiple piece actors in place of one large actor constructed from the pieces. In the next lesson, where we create a particle system, we see the potential for adding a great deal of objects into the scene simultaneously from a point source.

Maintaining “hidden” kinematic actors with contact generation enabled but collison response turned off is one way to avoid a massive recalculation of the broad phase when introducing new objects into a scene. You will eventual “unhide” these actors as you make them collidable and dynamic. For this example, you can spawn all of the piece actors up front, make them kinematic, then enable contact generation and disable collision response on them. You will need to set their positions and orientations each frame to shadow the movement of the shapes of the actor they will eventually replace when those shapes are removed.

The kinematic actors that form the piece actors have contact generation enabled, so they will be updated properly in the broad phase potentially collidable objects list as the simulation progresses. Because of this, introducing them into the scene by making them dynamic and turning on collision response will have no impact on the broad phase.

5 Conclusion

This is a method to simulate fragmentation. It costs very little while the object is not fragmented, but during the process of fragmenting there will be overhead in the form of creating a new actor and recalculating the old compound actor.

6 Related Classes, Functions, and Parameters

None
Last edited by veegun on Sat Dec 09, 2006 3:48 pm, edited 1 time in total.
veegun
Posts: 59
Joined: Mon May 29, 2006 1:58 am

Lesson 601: Heightfields

Post by veegun »

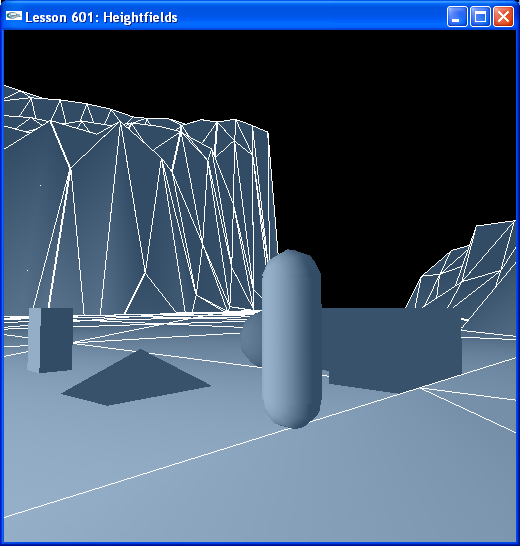
Lesson 601: Heightfields

Image

1 Introduction

In this first lesson on gameplay physics, we will build a triangle mesh shape from a heightfield image and place various types of dynamic objects on it. We could use a heightfield shape interchangeably here as well.

2 Heightfields

All our familiar objects are back for this lesson.

Code: Select all


// Actor globals
extern NxActor* groundPlane;
extern NxActor* box;
extern NxActor* sphere;
extern NxActor* capsule;
extern NxActor* pyramid;
extern NxActor* concaveObject;
extern NxActor* heightfield;

// Focus actor
extern NxActor* gSelectedActor;
…
void InitNx()
{
    // Create a memory allocator
    gAllocator = new UserAllocator;

    // Create the physics SDK
    gPhysicsSDK = NxCreatePhysicsSDK(NX_PHYSICS_SDK_VERSION, gAllocator);
    if (!gPhysicsSDK)  return;

    // Set the physics parameters
    gPhysicsSDK->setParameter(NX_SKIN_WIDTH, 0.01);

    // Set the debug visualization parameters
    gPhysicsSDK->setParameter(NX_VISUALIZATION_SCALE, 1);
    gPhysicsSDK->setParameter(NX_VISUALIZE_COLLISION_SHAPES, 1);
    gPhysicsSDK->setParameter(NX_VISUALIZE_ACTOR_AXES, 1);
    gPhysicsSDK->setParameter(NX_VISUALIZE_COLLISION_FNORMALS, 1);

    // Create the scene
    NxSceneDesc sceneDesc;
    sceneDesc.gravity = gDefaultGravity;
    gScene = gPhysicsSDK->createScene(sceneDesc);

    // Create the default material
    NxMaterial* defaultMaterial = gScene->getMaterialFromIndex(0); 
    defaultMaterial->setRestitution(0.5);
    defaultMaterial->setStaticFriction(0.5);
    defaultMaterial->setDynamicFriction(0.5);

    // Create the objects in the scene
    groundPlane = CreateGroundPlane();

    NxVec3 A = NxVec3(1,0,0);
    NxVec3 B = NxVec3(0,0,1);
    NxVec3 C;

    C = A.cross(B);

    heightfield = CreateHeightfield(NxVec3(0,0,0), 0, 200);

    gCameraPos = NxVec3(-25,55,15);
    gCameraSpeed = 0.5;

    box = CreateBox(gCameraPos + NxVec3(5,0,10), NxVec3(0.5,1,0.5), 20);
    sphere = CreateSphere(gCameraPos + NxVec3(0,0,15), 1, 10);
    capsule = CreateCapsule(gCameraPos + NxVec3(-5,0,10), 2, 0.5, 10);
    pyramid = CreatePyramid(gCameraPos + NxVec3(0,0,10), NxVec3(1,0.5,1.5), 10);
    concaveObject = CreateConcaveObject(gCameraPos + NxVec3(-4,0,15), NxVec3(1,1,1), 5);

    AddUserDataToActors(gScene);

    gSelectedActor = box;
...
}

CreateHeightfield() is the newest object creation function of the lot. Looking at it you will notice it reads in a TGA file and uses the image data from the file to create a heightfield.

Code: Select all


#define HEIGHTFIELD_SIZE  32
#define HEIGHTFIELD_NB_VERTS HEIGHTFIELD_SIZE*HEIGHTFIELD_SIZE
#define HEIGHTFIELD_NB_FACES (HEIGHTFIELD_SIZE-1)*(HEIGHTFIELD_SIZE-1)*2
#define HEIGHTFIELD_OFFSET  -20
#define HEIGHTFIELD_WIDTH  20

NxVec3* gHeightfieldVerts = NULL;
NxVec3* gHeightfieldNormals = NULL;
NxU32* gHeightfieldFaces = NULL;

NxActor* CreateHeightfield(const NxVec3& pos, int index, NxReal step)
{
    tgaInfo* heightfield = NULL;

    // Set terrain data directory
    int set = 0;

#ifndef LINUX
    set = SetCurrentDirectory(&fname[0]);
    if (!set) set = SetCurrentDirectory(&fname2[0]);
    if (!set) set = SetCurrentDirectory(&fname3[0]);
#else
    set = chdir(&fname[0]);
    if (set != 0) set = chdir(&fname2[0]);
    if (set != 0) set = chdir(&fname3[0]);
#endif
 
    if (index == 0)
        heightfield = tgaLoad("terrain1.tga");
    else if (index == 1)
        heightfield = tgaLoad("terrain2.tga");
    else
        heightfield = tgaLoad("terrain3.tga");

    // Initialize heightfield vertices
    gHeightfieldVerts = new NxVec3[HEIGHTFIELD_NB_VERTS];
    for (NxU32 y=0;y<HEIGHTFIELD_SIZE;y++)
    {
        for (NxU32 x=0;x<HEIGHTFIELD_SIZE;x++)
        {
            gHeightfieldVerts[x+y*HEIGHTFIELD_SIZE] = NxVec3(NxF32(x)-(NxF32(HEIGHTFIELD_SIZE-1)*0.5f), 0.0f, NxF32(y)-(NxF32(HEIGHTFIELD_SIZE-1)*0.5f)) * HEIGHTFIELD_WIDTH;
        }
    }

    // Initialize heightfield faces
    gHeightfieldFaces = new NxU32[HEIGHTFIELD_NB_FACES*3];
    NxU32 k = 0;
    for (NxU32 j=0;j<HEIGHTFIELD_SIZE-1;j++)
    {
        for (NxU32 i=0;i<HEIGHTFIELD_SIZE-1;i++)
        {
            // Create first triangle
            gHeightfieldFaces[k++] = i   + j*HEIGHTFIELD_SIZE;
            gHeightfieldFaces[k++] = i   + (j+1)*HEIGHTFIELD_SIZE;
            gHeightfieldFaces[k++] = i+1 + (j+1)*HEIGHTFIELD_SIZE;

            // Create second triangle
            gHeightfieldFaces[k++] = i   + j*HEIGHTFIELD_SIZE;
            gHeightfieldFaces[k++] = i+1 + (j+1)*HEIGHTFIELD_SIZE;
            gHeightfieldFaces[k++] = i+1 + j*HEIGHTFIELD_SIZE;
        }
    }

    // Build heightfield from image data
    for (NxU32 i = 0; i < heightfield->width; i++)
    {
        for (NxU32 j = 0; j < heightfield->height; j++)
        {
            unsigned char h = (unsigned char)(*(heightfield->imageData + i + j*heightfield->width));
            gHeightfieldVerts[((heightfield->width - 1) - i) + j*heightfield->width].y = ((float)h/255.0)*step + 10;
        }
    }

    // Build vertex normals
//    gHeightfieldNormals = new NxVec3[HEIGHTFIELD_NB_VERTS];
//    NxBuildSmoothNormals(HEIGHTFIELD_NB_FACES, HEIGHTFIELD_NB_VERTS, gHeightfieldVerts, gHeightfieldFaces, NULL, gHeightfieldNormals, true);

    // Build physical model
    NxTriangleMeshDesc heightfieldDesc;
    heightfieldDesc.numVertices    = HEIGHTFIELD_NB_VERTS;
    heightfieldDesc.numTriangles    = HEIGHTFIELD_NB_FACES;
    heightfieldDesc.pointStrideBytes   = sizeof(NxVec3);
    heightfieldDesc.triangleStrideBytes  = 3*sizeof(NxU32);
    heightfieldDesc.points    = gHeightfieldVerts;
    heightfieldDesc.triangles    = gHeightfieldFaces;       
    heightfieldDesc.heightFieldVerticalAxis  = NX_Y;
    heightfieldDesc.heightFieldVerticalExtent = -1000;

    NxTriangleMeshShapeDesc heightfieldShapeDesc;
    NxInitCooking();
    if (0)
    {
        // Cooking from file
#ifndef LINUX
        bool status = NxCookTriangleMesh(heightfieldDesc, UserStream("c:\\tmp.bin", false));
        heightfieldShapeDesc.meshData = gPhysicsSDK->createTriangleMesh(UserStream("c:\\tmp.bin", true));
#else
        printf("Linux does not behave well with UserStreams, use MemorBuffers instead\n");
        exit(1);
#endif
    }
    else
    {
        // Cooking from memory
        MemoryWriteBuffer buf;
        bool status = NxCookTriangleMesh(heightfieldDesc, buf);
        heightfieldShapeDesc.meshData = gPhysicsSDK->createTriangleMesh(MemoryReadBuffer(buf.data));
    }

    if (heightfieldShapeDesc.meshData)
    {
        NxActorDesc actorDesc;
        actorDesc.shapes.pushBack(&heightfieldShapeDesc);
        actorDesc.globalPose.t = pos;  // NxVec3(0,0,0);
        NxActor* actor = gScene->createActor(actorDesc);

        return actor;
//      gPhysicsSDK->releaseTriangleMesh(*heightfieldShapeDesc.meshData);
    }

    return NULL;
}

Notice the triangle mesh descriptor is constructed in exactly the same fashion as with the mesh objects in the previous lessons with the exception of two lines:

Code: Select all


    heightfieldDesc.heightFieldVerticalAxis  = NX_Y;
    heightfieldDesc.heightFieldVerticalExtent = -1000;

This designates the triangle mesh as a heightfield. Its natural up-vector is the y-axis and it extends 1000 units below the origin, that is, all objects between the plane at y = -1000 and the surface of the heightfield will be pushed upward to until they clear the surface of the heightfield. By default, triangle meshes are not heightfields and “heightFieldVerticalAxis” is set to NX_NOT_HEIGHTFIELD.

3 Conclusion

You know now how to construct a triangle mesh heightfield object from an elevation map.

4 Related Classes, Functions, and Parameters

Code: Select all


NxTriangleMeshDesc
    heightFieldVerticalAxis
    heightFieldVerticalExtent 

NxHeightFieldAxis    
    NX_X
    NX_Y
    NX_Z 
    NX_NOT_HEIGHTFIELD

Last edited by veegun on Sat Dec 09, 2006 3:47 pm, edited 1 time in total.
veegun
Posts: 59
Joined: Mon May 29, 2006 1:58 am

Lesson 402: Spring-Mass Cloth

Post by veegun »

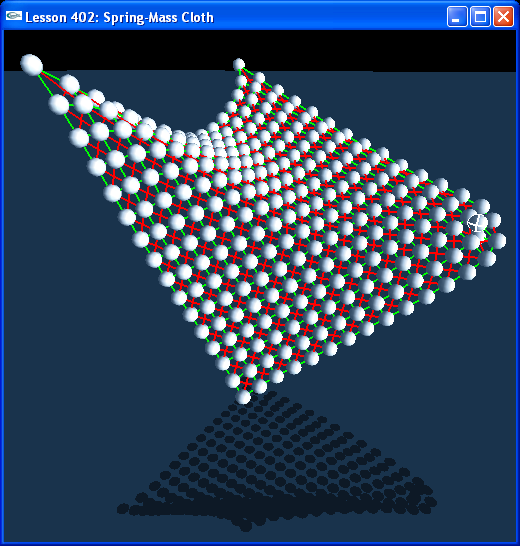
Lesson 402: Spring-Mass Cloth

Image

1 Introduction

We can also create large-scale rigid body effects with springs. This example simulates cloth by connected a grid of spheres together with springs.

2 Spring-Mass Cloth

We call a function CreateCloth() in InitNx().

Code: Select all


// Actor globals
NxActor* groundPlane = NULL;
NxActor** clothMasses = NULL;

class ClothSpring
{
public:
    NxSpringAndDamperEffector* horizSpring;
    NxSpringAndDamperEffector* vertSpring;
    NxSpringAndDamperEffector* crossUpSpring;
    NxSpringAndDamperEffector* crossDownSpring;
};

ClothSpring** clothSprings = NULL;

void InitNx()
{
…
    CreateCloth(NxVec3(0,0,0), 16, 16, 0.5, 0.5);
…
}

This creates a 16-by-16 grid of spheres connected together by a spring mesh using the four spring-dampers of ClothSpring. We define the compress and stretch constants globally for the cloth.

Code: Select all

 
const NxReal kSpringCompressSaturateRatio = 0.1;
const NxReal kSpringStretchSaturateRatio = 2;
const NxReal kSpringCompressForce = 1;
const NxReal kSpringStretchForce = 4;

const NxReal kDamperCompressSaturateVel = -0.1;
const NxReal kDamperStretchSaturateVel = 0.1;
const NxReal kDamperCompressForce = 0.25;
const NxReal kDamperStretchForce = 0.25;

Try adjusting these parameters, as well as the sphere mass parameters, and see how it changes the cloth. Notice how if you change any of the spring constants too much, the cloth can start resonating too much and explode.

3 Conclusion

This has been a lesson on spring-mass cloth. In the next lesson we build cloth out of jointed rigid bodies.
Last edited by veegun on Sat Dec 09, 2006 3:47 pm, edited 1 time in total.
veegun
Posts: 59
Joined: Mon May 29, 2006 1:58 am

Lesson 404: Ragdolls

Post by veegun »

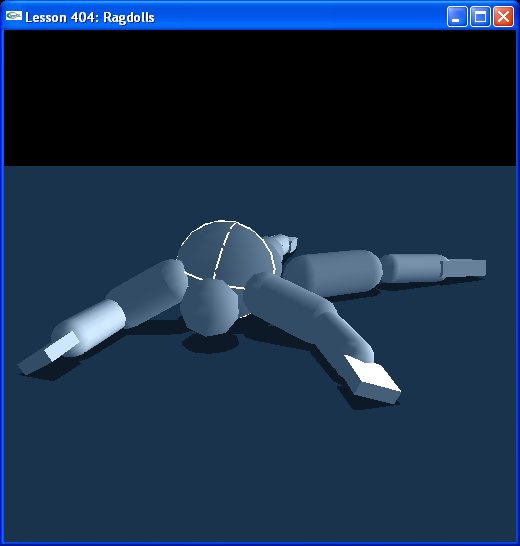
Lesson 404: Ragdolls

Image

1 Introduction

Ragdolls are often used in games to simulate a character going limp or staggering back after getting killed or injured. From the start, you want to build your character with the joints and masses in place. You then turn off the physics on the character and make it move under your animation. When you want the character to go ragdoll, turn off the animation control, make the bodies in the ragdoll dynamic and turn on their joints.

2 Ragdolls

We use a Ragdoll class to create our ragdoll.

Code: Select all


class Ragdoll
{
…
    NxActor* head;
    NxActor* torso;
    NxActor* pelvis;
    NxActor* leftUpperArm;
    NxActor* rightUpperArm;
    NxActor* leftForeArm;
    NxActor* rightForeArm;
    NxActor* leftHand;
    NxActor* rightHand;
    NxActor* leftThigh;
    NxActor* rightThigh;
    NxActor* leftCalf;
    NxActor* rightCalf;
    NxActor* leftFoot;
    NxActor* rightFoot;

    NxSphericalJoint* neck;
    NxSphericalJoint* leftShoulder;
    NxSphericalJoint* rightShoulder;
    NxSphericalJoint* spine;
    NxSphericalJoint* leftHip;
    NxSphericalJoint* rightHip;

    NxRevoluteJoint* leftElbow;
    NxRevoluteJoint* rightElbow;
    NxRevoluteJoint* leftWrist;
    NxRevoluteJoint* rightWrist;
    NxRevoluteJoint* leftKnee;
    NxRevoluteJoint* rightKnee;
    NxRevoluteJoint* leftAnkle;
    NxRevoluteJoint* rightAnkle;
};
...
Ragdoll* guy = NULL;
…
InitNx()
{
..
    guy = new Ragdoll(NxVec3(0,0,0));
…
}

The ragdoll is made of 15 actors composing the body. The actors are connected by joints, half spherical and half revolute. The spherical joints are used for the inner connections, like the neck, shoulders, and hips, while the revolute joints are used for the outer connections, like the wrists and ankles.

3 Ragdoll Joint Limits

Run the lesson and hit “b” to go to Debug Mode. Note the limits on the spherical joints and how they tend to match the range of motion for a human. The revolute joints currently have no limits in place, so our ragdoll is fairly limber. As an exercise, put in limits on the revolute joints using your own body as a reference.

4 Conclusion

Ragdolls are probably the most mainstream use of jointed physics in games. In future lessons, we will take an animated character and turn it into a ragdoll. We will also look at how to drive an animation with physics using the 6 DOF joint.
veegun
Posts: 59
Joined: Mon May 29, 2006 1:58 am

Lesson 410: Particle Systems

Post by veegun »

Lesson 410: Particle Systems

Image

1 Introduction

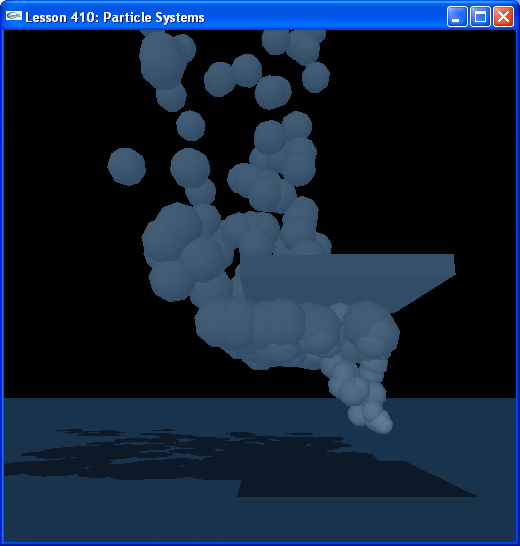
We create a particle emitter class and a particle class. The particle emitter object spawns new particle objects on every frame. The particles are actors that get updated on their own every frame.

2 Particle Systems

In InitNx(), we build our particle emitter object.

Code: Select all


const NxCollisionGroup cParticleCollisionGroup = 1;
...
// Particle system globals
ParticleEmitter* gParticleEmitter = NULL;
NxReal fStartingParticleSpeed = 5.0f; // scale of initial particle velocity, in m/s
NxReal fVerticalThermoDynamicAccel = 5.0f; // scale of false vertical thermodynamic acceleration  (smoke accelerates upward at this rate in m/s^2 )
...
void InitNx()
{
...
    // Create the objects in the scene
    groundPlane = CreateGroundPlane();

    // This
    CreateStaticBox();

    // Ok, now add our emitter
    gParticleEmitter = new ParticleEmitter( gScene, NxVec3( -5.0f, 5.0f, 0.0f ), fStartingParticleSpeed, NxVec3( 0.0f, fVerticalThermoDynamicAccel, 0.0f ));

    // cParticleCollisionGroup == 1
    // this is a group specifically for particles
    // at the moment, it collides with everything but itself
    // so that smoke particles don't collide with themselves (an optimization)
    // you might want to also make it not collide with certain other objects
    gPhysicsSDK->setGroupCollisionFlag(cParticleCollisionGroup, cParticleCollisionGroup, false);
...
}

CreateStaticBox() builds a roof above the particle emitter so the particles have an environmental object to collide with as they rise through the air.

Code: Select all


NxActor* CreateStaticBox()
{
    // Add a single-shape actor to the scene
    NxActorDesc actorDesc;

    // The actor has one shape, a box, fCubeSide meters on a side
    NxBoxShapeDesc boxDesc;
    boxDesc.dimensions.set( 10.0f, 1.0f, 10.0f );
    actorDesc.shapes.pushBack(&boxDesc);

    actorDesc.body = NULL; // make her static
    actorDesc.density = 10.0f;
    actorDesc.globalPose.t.set( 0.0f, 20.0f, 0.0f );
    return gScene->createActor(actorDesc); 
}

The particles created by the emitter will be assigned to the “cParticleCollisionGroup” group of collision shapes. This group is made non-intersecting so the particles can self-intersect and won't interfere with each other.

Code: Select all


    gPhysicsSDK->setGroupCollisionFlag(cParticleCollisionGroup, cParticleCollisionGroup, false);

We create a particle emitter just below the static roof at (-5,5,0) and supply it with a starting speed for our particles as well as a thermo-dynamic acceleration to make the particles accelerate as they rise through the air.

Code: Select all


    gParticleEmitter = new ParticleEmitter(gScene, NxVec3(-5,5,0), fStartingParticleSpeed, NxVec3(0,fVerticalThermoDynamicAccel,0));

3 Particle Emitter Class

Take a look at the particle emitter constructor in Particle.cpp.

Code: Select all


ParticleEmitter::ParticleEmitter(NxScene* pSceneToSet, NxVec3& vStartingPos, NxReal fStartingVelScale, NxVec3& vThermoDynamicAcceleration)
{
    _iHeadIndex = 0;
    _iTailIndex = 0;
    _iParticleCount = 0;
    _pScene = pSceneToSet;
    _vStartingPos = vStartingPos;
    _fStartingVelScale = (1.0f / NxReal(RAND_MAX)) * fStartingVelScale;
    _fNewParticleTimer = 0.0f;
    _vThermoDynamicAcceleration = vThermoDynamicAcceleration;
}

We start out with a zero particle count. We give our emitter a pointer to the scene so it can create particle actors in its update call. The starting velocity is randomly determined on a scale of a maximum starting velocity which we passed in to the constructor. We set its thermodynamic acceleration, which will specifies how fast the particles will rise through the air.

Once created, the particle emitter class gets updated in RunPhysics().

Code: Select all


void RunPhysics()
{
    // Update the time step
    NxReal deltaTime = UpdateTime();

    // Run collision and dynamics for delta time since the last frame
    gScene->simulate(deltaTime); 
    gScene->flushStream();
    gScene->fetchResults(NX_RIGID_BODY_FINISHED, true);

    gParticleEmitter->update(deltaTime);
}

This calls the particle emitter's update method, passing in the time slice for the frame.

Code: Select all


void ParticleEmitter::update(NxReal fDeltaTime)
{
    _fNewParticleTimer -= fDeltaTime;
    if (_fNewParticleTimer < 0.0f)
    {
        addParticle();
        _fNewParticleTimer += cfTimeBetweenParticles;
    }

    // Update all particles
    int iParticlesUpdated = 0;
    for (int iParticleIndex = _iTailIndex; iParticlesUpdated < _iParticleCount; iParticleIndex = ((iParticleIndex+1) % ciMaxParticles))
    {
        _aParticleArray[iParticleIndex]->update(fDeltaTime);
        ++iParticlesUpdated;
    }
}

4 Particle Class

The emitter's update method calls it's addParticle() method when the time for a new particle is hit. This creates a particle object.

Code: Select all


void ParticleEmitter::update(NxReal fDeltaTime)
{
    _fNewParticleTimer -= fDeltaTime;
    if (_fNewParticleTimer < 0.0f)
    {
        addParticle();
        _fNewParticleTimer += cfTimeBetweenParticles;
    }
...
}

void ParticleEmitter::addParticle()
{
    if ((_iTailIndex == _iHeadIndex) && (_iParticleCount != 0)) // FIFO is full
    {
        removeParticle();
        // Now there is a slot free
    }

    // Add a single-shape actor to the scene
    NxActorDesc actorDesc;
    NxBodyDesc bodyDesc;

    NxSphereShapeDesc sphereDesc;
    sphereDesc.radius = 1.0f;
    sphereDesc.group = cParticleCollisionGroup; // this group does not collide with itself
    actorDesc.shapes.pushBack(&sphereDesc);

    actorDesc.body = &bodyDesc;
    actorDesc.density = 10.0f;
    actorDesc.globalPose.t = _vStartingPos;

    NxActor* pNewActor =  _pScene->createActor(actorDesc);

    // Give it an initial linear velocity, scaled by _fStartingVelScale
    NxVec3 vRandVec(NxReal(rand()*_fStartingVelScale), NxReal(rand()*_fStartingVelScale), NxReal(rand()*_fStartingVelScale));
    pNewActor->setLinearVelocity(vRandVec);

    // Turn off gravity for smoke
    pNewActor->raiseBodyFlag(NX_BF_DISABLE_GRAVITY);

    _aParticleArray[_iHeadIndex] = new Particle(pNewActor, _vThermoDynamicAcceleration);

    _iHeadIndex = (_iHeadIndex+1) % ciMaxParticles;
    ++_iParticleCount;
}

The new particle is a sphere-shape actor. Gravity is disabled on it. The particle's constructor gets the newly created actor to build it.

Code: Select all


Particle::Particle(NxActor* pToSet, NxVec3& vThermoDynamicAcceleration)
{
    setActor(pToSet);

    // F = M*a
    _vThermoDynamicForce = pToSet->getMass()*vThermoDynamicAcceleration;
}

void Particle::setActor(NxActor* pToSet)
{
    _pActor = pToSet;
}

The emitter then updates all the particles in its particle array.

Code: Select all


void ParticleEmitter::update(NxReal fDeltaTime)
{
...
    // Update all particles
    int iParticlesUpdated = 0;
    for (int iParticleIndex = _iTailIndex; iParticlesUpdated < _iParticleCount; iParticleIndex = ((iParticleIndex+1) % ciMaxParticles))
    {
        _aParticleArray[iParticleIndex]->update(fDeltaTime);
        ++iParticlesUpdated;
    }
}

Particles get updated according to the particle object's update method.

Code: Select all


void Particle::update(NxReal fDeltaTime)
{
    // particles have a false, thermodynamic force applied which pushes them up every frame
    _pActor->addForce(_vThermoDynamicForce);

    // Use our down-caster to get a sphere pointer (and make sure it is a sphere)
    NxSphereShape* pSphere = _pActor->getShapes()[0]->isSphere();
    const NxReal fMaxRadius = 3.0f;
    const NxReal fGrowthRate = 0.6f;
    if (pSphere)
    {
        // Grow the radius at growth rate fGrowthRate m/s, until it reaches fMaxRadius meters
        NxReal fCurrentRadius = pSphere->getRadius();
        if (fCurrentRadius < fMaxRadius)
        {
            pSphere->setRadius(pSphere->getRadius() + fGrowthRate*fDeltaTime);
            if (pSphere->getRadius() > fMaxRadius)
                pSphere->setRadius(fMaxRadius);
        }
    }
}

The particle object's update method supplies the upward thermodynamic force to the particle actor and increases its radius until the particle has reached a maximum radius.

5 Conclusion

We have created a particle system feature built on top of the SDK. The SDK has a built-in system of fluid particles which can be made self-interacting or non-selfinteracting. As we will see, the system we have created is very much like a system of non-selfinteracting fluid particles generated by the SDK, only with parameters we have specified outside of the SDK. Our system is not as fast or efficient as the SDK's streamlined particle system. It serves to demonstrate, however, that SDK is very versatile and offers many paths to choose from to accomplish the effects you want.

6 Related Classes, Functions, and Parameters

None
veegun
Posts: 59
Joined: Mon May 29, 2006 1:58 am

Lesson 105 &#8211; Materials

Post by veegun »

Lesson 105: Materials

Image

1 Introduction

In this lesson we learn about object materials and their properties of restitution and friction.

2 Materials

Materials are the physical substance objects are made of. They define the interior properties of the object, restitution, as well as the surface properties of the object, friction. Both material components are linked to the physical concept of friction. The lower the resitution, the more energy will be lost to heat and the less it will rebound from an impact. The higher the restitution, the less energy it will lose, and the more it will reflect from an impact. How much energy is lost when the object slides along another surface? The higher the surface friction of an object, the more energy will be lost when sliding, the more the object will brake. An object with a low surface friction will lose less energy sliding and tend to glide across a surface unrestricted.

3 Restitution

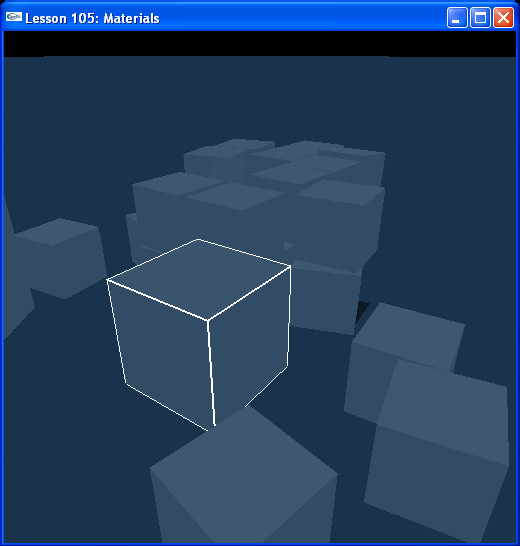
If you look at InitNx(), you’ll see that we create a large, heavy box, suspended above the origin and a stack of small boxes to the left. Run the lesson. Hit “p” to unpause the simulation and drop the box from its starting height. On the first bounce, the top of the box just clears the stack of boxes to the left. Now look at the code in that creates the default material.

Code: Select all


void InitNx()
{
…
    // Create the default material
    NxMaterial* defaultMaterial = gScene->getMaterialFromIndex(0); 
    defaultMaterial->setRestitution(0.5);
    defaultMaterial->setStaticFriction(0.5);
    defaultMaterial->setDynamicFriction(0.5);
…
}

Change the restitution of the default material to 0.25.

Code: Select all


    defaultMaterial->setRestitution(0.25);

Now drop the box. Notice that the box rebounds much less than before, not even reaching the height of the stack. When you drive the box into the stack of boxes, it basically just shoves them aside, the boxes in the stack rebound very little. You can return the box to the origin by hitting “t” to make it drop again.

Now change it to 0.75.

Code: Select all


    defaultMaterial->setRestitution(0.75);

Run the lesson and drop the box. The box rebounds way above the height of the stack. Even the bottom of the box clears the stack. If you run the box into the stack, notice how much the other boxes rebound off it and scatter. Restitution is the bounciness of an object. It defines how much the object will rebound after colliding with other objects.

4 Static Friction

Set the default material’s restitution back to 0.5 and change the default material’s static friction to 0.95.

Code: Select all


    defaultMaterial->setStaticFriction(0.95);

Drop the box and wait for it to stop bouncing. Trying moving it with “umijkl”. Notice how difficult it is to start the object moving from a stop with the high static friction, but once you get it moving, it slides fairly easily. This is static friction. It is the stopping force against the object when it’s resting against a surface, basically how well the object sticks to the ground or other surface when it’s not moving. Notice that 0.95 is sticky enough that box occasionally prefers to roll on its edge rather than slide.

5 Dynamic Friction

Set the default material’s static friction back to 0.5 and change its dynamic friction to 0.1.

Code: Select all


    defaultMaterial->setDynamicFriction(0.1);

The box glides very easily over the plane with the low dynamic friction. Dynamic friction is a stopping force against the object while it’s moving along the ground or other surface.

6 Material Combine Modes

All objects in our scene are made of the same material. When objects made of two different materials collide, their restitutions and frictions are averaged by default. You can change this by changing the combine mode on the material to get it to react to other objects' materials in different ways.

There is a Friction Combine Mode field and a Restitution Combine Mode field on each material.

The two fields can each be set to one of the following:

Code: Select all


    NX_CM_AVERAGE - average the values (default)
    NX_CM_MIN – take the minimum of the values
    NX_CM_MULTIPLY - multiply the values
    NX_CM_MAX – take the maximum of the values
    NX_CM_TABLE – use the result of a table to combine the values

Only one combine mode from one material will be used in a collision. If the combine modes on the objects differ, the higher priority combine mode is used. The order of priority of combine modes from lowest to highest is:

Code: Select all


    NX_CM_AVERAGE
    NX_CM_MIN
    NX_CM_MULTIPLY
    NX_CM_MAX
    NX_CM_TABLE

So, for example, the loweset priority combine mode is the default combine mode, NX_CM_AVERAGE, so any other combine mode set on another object will override it.

To set a friction combine mode on a material, use NxMaterial::setFrictionCombineMode(). To set a restitution combine mode on a material, use NxMaterial::setRestitutionCombineMode().

7 Friction Scaling

You can scale the magnitude of static and dynamic friction of all your materials at once using the NX_DYN_FRICT_SCALING and NX_STA_FRICT_SCALING parameters. To make use of them, you need to add them to InitNx().

Code: Select all


void InitNx()
{
…
    gPhysicsSDK->setParameter(NX_DYN_FRICT_SCALING, 0.5);
    gPhysicsSDK->setParameter(NX_STA_FRICT_SCALING, 0.5);
…
}

Setting these two parameters this way will halve the static and dynamic friction values on all materials in the simulation (the default for both parameters is 1). An example use for this scaling might be, in a racing game, gradually make all materials slippery if conditions become wet or icy, then gradually return them to their default values once conditions return to normal.

8 Bounce Threshold

Last in this lesson is the bounce threshold parameter. Set this in InitNx().

Code: Select all


    gPhysicsSDK->setParameter(NX_BOUNCE_THRESHOLD, -100);

Drop the box. It doesn’t bounce. All objects with a relative velocity below the bounce threshold will not bounce (it is negative because the velocity is a relative velocity, basically a closing velocity between the object and what it’s colliding with.)

This parameter is useful for stopping objects prone to bouncing repeatedly until there is little visible or physical result from their bouncing, like a basketball vibrating on the ground after it has been dropped. These are usually high-restitution objects.

9 Conclusion

You should now know how to set up a material in the SDK, how to use the material parameters of restitution and friction, how to use the restitution and friction combine modes of materials, how to scale the friction on materials globally, and how to set a lower limit on the “bounce velocity” of your objects.

10 Related Classes, Functions, and Parameters

Code: Select all


NxMaterial
    setRestitution()
    setStaticFriction()
    setDynamicFriction()
    setFrictionCombineMode()
    setRestitutionCombineMode()

NxCombineMode
    NX_CM_AVERAGE
    NX_CM_MIN
    NX_CM_MULTIPLY
    NX_CM_MAX
    NX_CM_TABLE

NxParameter
    NX_DYN_FRICT_SCALING
    NX_STA_FRICT_SCALING
    NX_BOUNCE_THRESHOLD

Virion
Competition winner
Posts: 2148
Joined: Mon Dec 18, 2006 5:04 am

Post by Virion »

is it legal if we add this into the irrlicht wiki?
Last edited by Virion on Thu Apr 19, 2007 1:22 pm, edited 1 time in total.
roxaz
Posts: 575
Joined: Tue Jan 23, 2007 8:35 pm
Location: LT

Post by roxaz »

WoWoWaUa! nice work
JDHunter
Posts: 17
Joined: Tue Jun 20, 2006 6:15 am
Location: Germany
Contact:

Post by JDHunter »

*FreaK* :wink:

Very very very nice :mrgreen:
Midnight
Posts: 1772
Joined: Fri Jul 02, 2004 2:37 pm
Location: Wonderland

Post by Midnight »

the part of physX thats selling me is the HW they are putting in the newest graphics cards for physX acceleration.

but the cloth ripping was amazing aswell.

nice work veegan you're quickly becomming another one of my heroes.
sRc
Posts: 431
Joined: Thu Jul 28, 2005 1:44 am
Location: Salt Lake City, Utah
Contact:

Post by sRc »

Midnight wrote:the part of physX thats selling me is the HW they are putting in the newest graphics cards for physX acceleration.
unless I missed soemthing, thats for Havoc acceleration, not PhysX. PhysX acceleration needs a PhysX card

concurrently, Havoc acceleration cant be done on PhysX cards because they dont have pixel shader 3 on them

http://www.havok.com/content/view/187/77/
The Bard sRc

Blog | Twitter
Midnight
Posts: 1772
Joined: Fri Jul 02, 2004 2:37 pm
Location: Wonderland

Post by Midnight »

I haven't done much research or anything.

http://www.ageia.com/physx/faqs.html#3

but what is that?

I realise it requires a physX capable card.. thats what I was talking about.

unless I'm just confused or something.. thats entirely possible. :wink:
Luben
Posts: 568
Joined: Sun Oct 09, 2005 10:12 am
Location: #irrlicht @freenode

Post by Luben »

I prefer graphic card / shader based physics. I don't want a special card for physics when i know my grapic card is capable of the same things.
If you don't have anything nice to say, don't say anything at all.
Post Reply