So here it is:
Color correction as a post-processing effect
Note: I want to point out that this is a guide, not a tutorial. I will be explaining the process, but I will not provide a full and working implementation. Pseudocode will be provided where needed.
The technique described here has been created using both personal research and various online resources. Since it's been a long time since I've first implemented this I can't really give any sources.
Description
The technique described in this guide allows you to do full-screen color correction as a post-processing effect by remapping parts of your final color palette using a shader. The technique can be implemented in about any rendering pipeline and is non-intrusive (ie. it does not affect any other parts of the rendering pipeline). Remapping of colors can be done easily and intuitively in popular image editing applications like Adobe Photoshop or Gimp.
Assumptions
Throughout the guide I will assume that the people interested in using this technique are already familiar with how post-processing works and how a post-processing framework can be implemented. Therefore I will not be going into setting up post-processing effects, how to set up screen quads, shaders, etc.
The technique:
The technique contains 2 passes: an offline remapping pass in Adobe Photoshop, Gimp or any other image editing suite allowing per-channel curve editing and importing/exporting of curve data, and an online color correction pass which will use the data created in your image editing software to alter your final scene output.
1. Remapping your colors
In this pass we will be taking an image of your original scene, and we will be correcting the colors to a desired result using the curves tool of your preferred image editing suite.
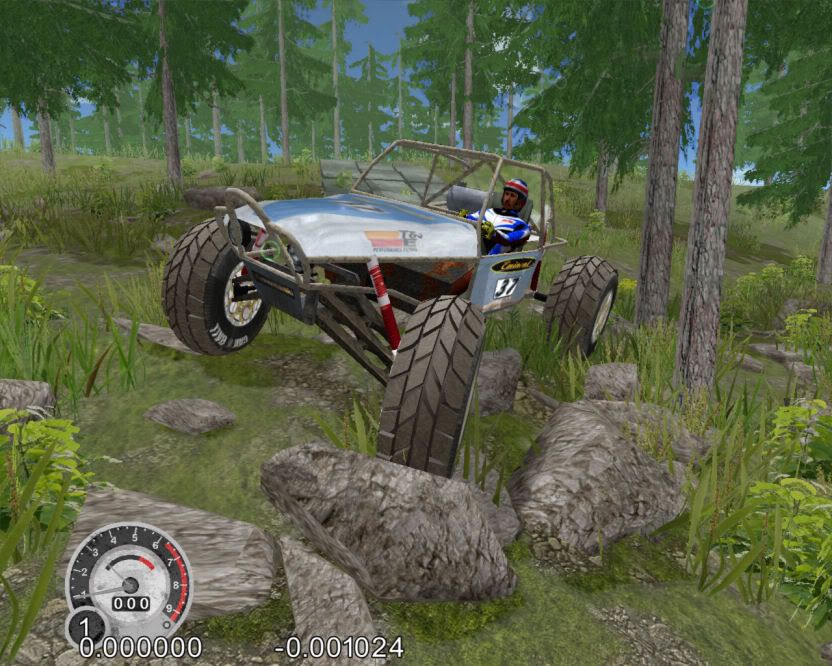
So, first of all we will require an image. This can be a simple screen capture of your scene output, but in theory could be any image you want (this will not guarantee good results, and will probably end up looking horrible). For this guide I will be using a debug-render made with my personal engine:

A normal render of Crytek's sponza atrium scene, please forgive the few material quirks found in the image
As you can see, the image looks rather dull and grey, which makes it a perfect candidate for color correction.
To apply color correction to this image we will be using a curve editor. In Adobe Photoshop it can be found in Image>Adjustments>Curves..., in Gimp it can be found in Colors>Curves...

Curve editors in Photoshop and Gimp respectively
You can alter individual curves for color channels by using the drop-down box marked 'Channel:'. You can play around with the curves for each channel until you get a good result. It can take some practice to get good results, but just hang in there. Photoshop also allows you to easily remap your black, mid and white tones respectively using the 3 eyedropper tools seen below the curve graph.
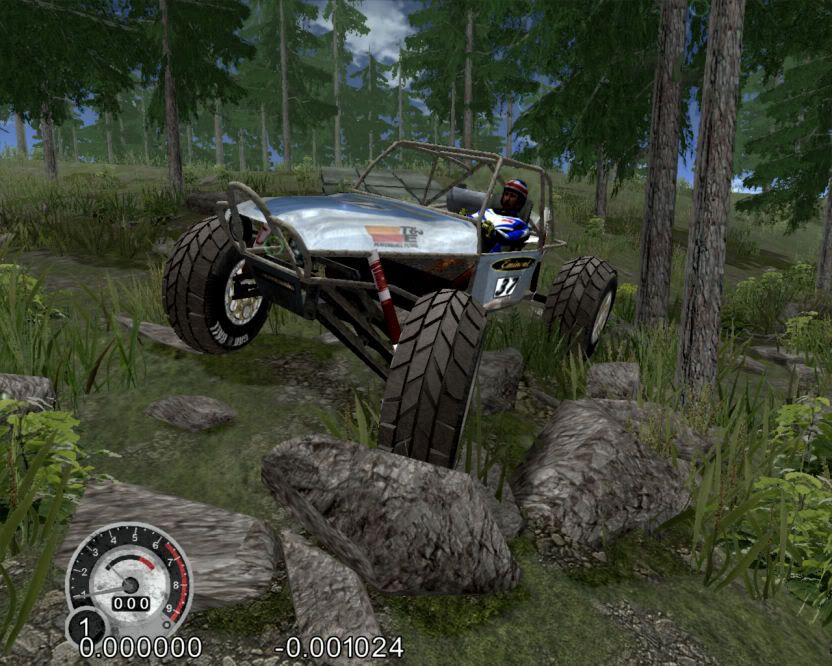
After playing with the curve controls I got this result:

The source image subtly remapped
Note: It is important not to close the curve editor window when you're happy with the result. We will be exporting the curve data to a file, and closing and re-opening the window will apply the alterations to the source images and you won't be able to get to the curve data anymore.
We will now be exporting our curve data to a file, to do this click the icon marked in below image and select Save preset... for Photoshop, or Export settings to file... for Gimp. Save the curves file to a place where you can find it again easily, because we will be needing it immediately.

The icons are marked with a red circle
Now, we will need to create a new image, we need a 1-dimensional image as a matter of fact, so we will be creating it with a width of 256 and a height of 1. (we use a width of 256 since an 8 bit integer color channel can hold values ranging from 0 to 255)
Once this image is created we will apply a black to white linear gradient on it from left to right. It is important that the gradient is evenly spread for the color correction to work properly.
Now that our gradient is in place we open the curve editor once again, click the same icons as marked above and choose Load preset... for Photoshop, or Import settings from file... in Gimp.
Open the curves file we exported earlier and apply it to our gradient image. You should now have an image looking similar to this (colors will vary based on your remapping):

This image will be used as an input texture in our second pass, so save it somewhere where you can find it.
2. Color correction
On to the technical part. This part will be quite a bit shorter than the previous part since the technique is actually rather simple.
I'm gonna go ahead and assume you have a post-processing framework set up, and that you now only require a pixel shader to get it running.
In the previous pass we created a 1D texture holding our color data for remapping our scene, we will use this texture together with our normal scene output as input for our post-processing effect
The process of applying our remapped data is quite straight forward, for each pixel we do the following:
1. Sample the color of our original scene output
2. Sample our curve texture once for each color channel in our original scene output (except alpha), using the value of said channel as the X-coordinate of our UV-coordinates. Since we're working with a 1D texture, we keep our Y-coordinate at a constant 0.5 so we sample the middle of our pixel
3. Store each sampled channel into a new color value, and optionally interpolate with our original scene output using a strength factor (this way you can tune the effect to your liking)
Pseudo-code:
Code: Select all
Texture curveTexture;
Texture sceneOutput;
float Strength; // This will determine how much the effect should contribute to the final scene

For each pixel:
    Color sceneColor = sample(sceneOutput, uv); // uv are the regular uv coordinates provided by your screen quad

    // Look up our remapped colors using the curve texture
    Color remappedColor;
    remappedColor.r = sample(curveTexture, float2(sceneColor.r, 0.5)).r;
    remappedColor.g = sample(curveTexture, float2(sceneColor.g, 0.5)).g;
    remappedColor.b = sample(curveTexture, float2(sceneColor.b, 0.5)).b;

    // Interpolate the remapped scene with the original scene
    Color outputColor = remappedColor * Strength + (1.0 - Strength) * sceneColor;
Here's the final result:

The final output
And here's a render of the same scene with different curve settings:

Of course, the result isn't identical to the one in the image editing software since we're using a simplified approach. You'll be able to take this error margin into account after a while and you'll be able to produce good looking corrected scenes
Possible improvements
To keep this guide simple I haven't talked about gamma correction in the technique or about gamma corrected rendering pipelines. Using a corrected rendering pipeline together with a gamma corrected version of this technique will give you results which are much closer to the ones created in your image editing software. If you don't know what gamma correction is or how to implement it, here's a good read: http://filmicgames.com/archives/299
Conclusion
We've seen a simple and straight-forward way of doing color correction in real-time. I hope this guide can be of help to those interested in implementing such a system.