Tutorial: Irrlicht & Dev-C++
by Andy
Spurgeon
Introduction
Based on posts that I saw in the help and discussion forums
for the Irrlicht Engine, asking for help using Irrlicht with
Dev-C++, I decided that a tutorial on the subject was needed.
After chatting briefly with Niko, I wrote this tutorial to
help people get started.
I'll try to be as detailed as possible and I have included
a number of screen shots to help people along This tutorial
was written around developers using Dev-C++ on the Windows
OS (because that's what I am using). Based on comments,
I believe that Dev-C++ setup on other platforms should be
pretty similar. If I get around to it, maybe I'll try
this on my Linux machine, and add some additional comments
at a later date.
NOTE: This tutorial assumes that you
have already downloaded and installed Dev-C++. You can
download it here,
if you have not.
Listed below are the basic steps we'll follow in the tutorial:
- Download and uncompress Irrlicht
- Start a new project in Dev-C++
- Configure Dev-C++ to find the Irrlicht headers it needs.
- Configure your Dev-C++ project to find the Irrlicht libraries
/ objects it needs.
- Configure your Dev-C++ project to use the Irrlicht DLL
at runtime.
- Write, compile, and execute the "Hello World"
application, using Dev-C++
In all of my work, I try to follow the KISS approach:
Keep It Simple Stupid! I
find this to be especially helpful since a lot of us do our
programming at 2am, while loaded on a 6-pack of Mountain Dew
8-). For this reason, in an effort to reduce errors
and make life easierI don't use a lot of shortcuts in my code,
or my tutorials, and I comment a lot. So, if this tutorial
appears overly detailed, that's why!
Step 1 -- Download and Uncompress Irrlicht
Download the latest version of Irrlicht here.
Once you've downloaded the archive, simply uncompress it to
a location you'll remember. For example, I use "irrlicht-0.3"
right now. This will give us a constant location to
access the required libraries, headers, etc.
Step 2 -- Start a new Dev-C++ Project
Now, we're ready to begin setting up a project in Dev-C++,
that we'll use with the Irrlicht Engine. Dev-C++ gives
us a lot of flexibility. We can organize our files into
directories and sub-directories, we can dump them all in one
place, we can use CVS, etc. For this tutorial, we'll
name our project, and create a new directory of the same name,
to keep it simple.
After starting Dev-C++, click on the "File" menu;
then click "New"; then click "Project".
The "New project" window will show up, like the
screenshot below.
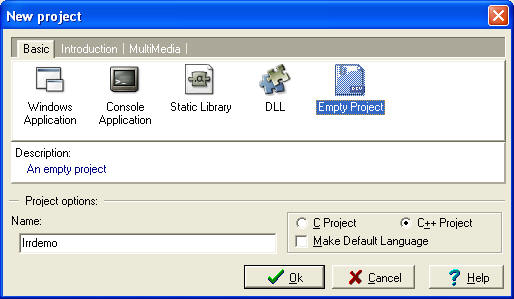
Dev-C++ gives you some options, depending on the type of
project you are creating. If you are creating a DLL
or Library to ride on top of the engine, you can select those,
and it will create a project outline for you. Beware
-- Dev-C++ is a work in progress, and there are still some
bugs. For example, I'm using Dev-C++ version 4.9.8.0,
and there are some issues with the DLL project (it does not
set some compiler options, etc). I recommend visiting
the Dev-C++ forums, for info on this stuff.
For the tutorial, we can select "Empty Project",
and then provide a name. I used "Irrdemo"
for this example.
When you complete that step, and click OK, a file dialog
will appear, asking you where to save the project. You
can put it almost anywhere. Again, to keep it simple,
I recommend a directory that matches the project name.
I used the dialog to create a new directory, "irrdemo",
and chose that.
Now, we have an empty project to work with.
Step 3 -- Add the Irrlicht Headers
AT this point, we have an empty project that doesn't do anything.
Pretty boring. For our next trick, we are going to tell
the Dev-C++ project where the Irrliccht "include"
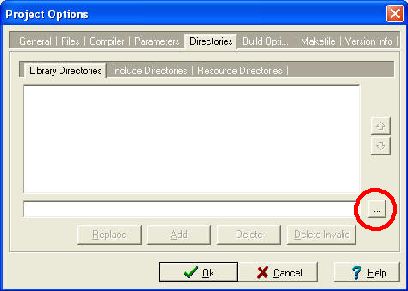
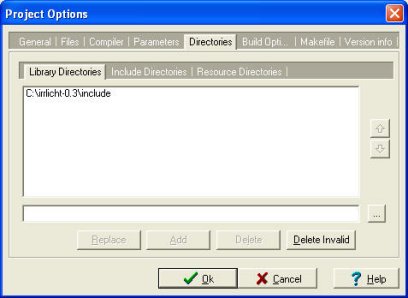
directory is. To do this, click on "Project"
then "Project Options". A dialog similar to
that shown below will open up. Click on the "Directories"
tab, then the "Include Directories" sub-tab.
In order to add the directory which includes the Irrlicht
headers (you really only need "irrlicht.h", but
it's easier to just add the directory) you can type is into
the text field, and click "Add". Or, you can
use the file dialog to browse for it. Do browse, click
the button with the ".." on it (circled in red in
the left image, below), navigate to the Irrlicht "include"
directory (for me, this is c:\irrlicht-0.3\include").
Press okay in the file dialog and then "Add", and
the directory will be added (see right image, below).
Step 4 -- Add the Irrlicht Libraries
Now that we have the headers added, the next step is to add
the Irrlicht libraries we'll need for compiling and linking.
Luckily, because he's such a good guy, Niko has bundled these
with the distribution, which makes our lives much easier.
We would import the source for Irrlicht and compile it ourselves,
but why, if we don't have to??
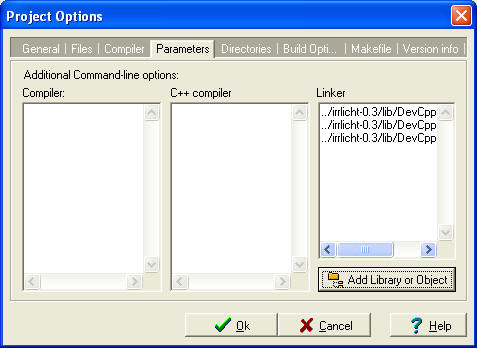
For release 0.3, we can find the files we need in "irrlicht-0.3\lib\DevCpp.
There are three files of interest:
- libIrrlicht.a -- the Irrlicht library
- libjpeg.a -- the Independant JPEG group library
- libz.a -- the zlib compression library
We're going to go ahead and add all three of these to our Dev-C++
project. To do that, go back to the "Project Options"
dialog, and click on the "Parameters" tab. Something
like the window below will appear. To add each of the
required libraries, simply click the "Add Library or Object"
button; use the file dialog to locate each of the libraries
listed below, and then click okay, Once you have added
all three, we're done, and you can click "Ok".
Step 5 -- Using the Irrlicht DLL at Runtime
In order to run your applications from within Dev-C++, for
debugging, or just for the sake of not having to go outside
the IDE to run them, the "irrlicht.dll" supplied
with Irrlicht must be in your PATH. With Windows, there
are two simple ways to do this:
- Add the "irrlicht-0.3\bin" directory from Step
1 to your PATH.
- Copy "irrlicht.dll" to your windows\system32
directory, which is in the PATH by default.
I'm not sure that any one method is better than the other
-- I use the first one in my programs, but both work.
Step 6 -- "Hello World" with Dev-C++
This is a simplified version of the "Hello World"
tutorial
that Niko wrote. This is just a little something to
display a window with some text. If you can write this,
compile, and run, then you'll know that you've set up your
Dev-C++ project correctly!
// HelloUniverse.cpp
// Include the Irrlicht header
#include "irrlicht.h"
// Irrlicht Namespaces
using namespace irr;
using namespace core;
using namespace scene;
using namespace video;
using namespace io;
using namespace gui;
int main()
{
IrrlichtDevice *irrDevice = createDevice(EDT_SOFTWARE,
dimension2d<s32>(512, 384),
16,
false,
false,
0);
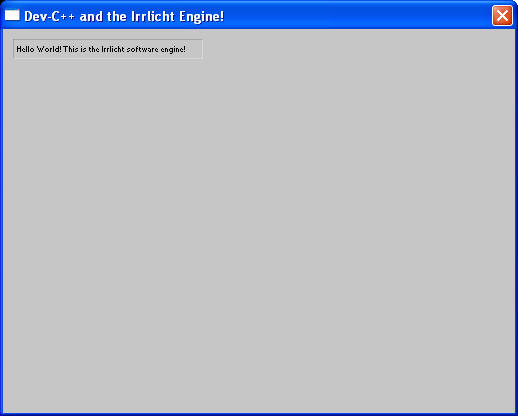
irrDevice->setWindowCaption(L"Dev-C++ and the Irrlicht Engine!");
IVideoDriver* irrDriver = irrDevice->getVideoDriver();
ISceneManager* irrSceneMgr = irrDevice->getSceneManager();
IGUIEnvironment* irrGUIEnv = irrDevice->getGUIEnvironment();
irrGUIEnv->addStaticText(
L"Hello World! This is the Irrlicht software engine!",
rect<int>(10,10,200,30), true, true, 0, -1);
while(irrDevice->run())
{
irrDriver->beginScene(true, true, SColor(0,192,192,192));
irrSceneMgr->drawAll();
irrGUIEnv->drawAll();
irrDriver->endScene();
}
irrDevice->drop();
return(0);
}
If all went according to plan, you should
see something like this, when you run the program.
|