There has been a previous tutorial on this matter, but I thought I could shed some more light to some more areas that weren't explained in as much detail.
my3d Homepage
When I first started using my3d, I had some troubles figuring out how to set up 3ds max right, so here is how.
1.) You need to have 2 map channels in your mind. One is for the diffuse map, and the other is for the lightmap. In my tutorial, I am using map channel 1 for the diffuse map and map channel 3 for the lightmap.
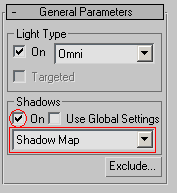
2.)Model your scene, texture it and set up your uvs correctly for the diffuse texture. When your scene is ready, set up your lights and under the light dialogs enable shadows and choose Shadow Map or Ray Traced Shadows (if you want shadows):
3.) Then, you can generate your lightmap. Have your object selected, then goto rendering->Render To Texture choose these settings:
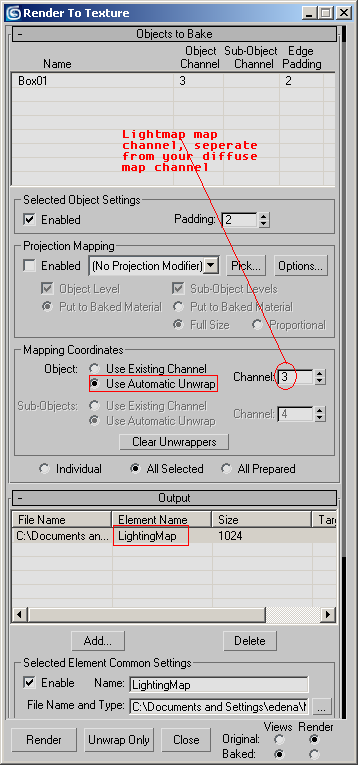
When choosing automatic unwrap, choose the channel that you've designated for your lightmap (mine is 3), seperate to your diffuse channel. Make sure to set a target path for the lightmap to generated on your hardrive.
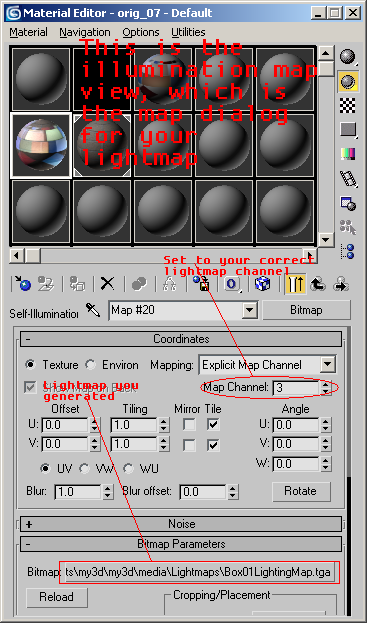
4.) Ok! Take the lightmap you generated, and set it as the illumination map in the top level of your material (In pic below) that's applied to the object you made a lightmap for. Once the lightmap is set to be the illumination map, you need to check the check box next to the illumination slot to make sure it is enabled.
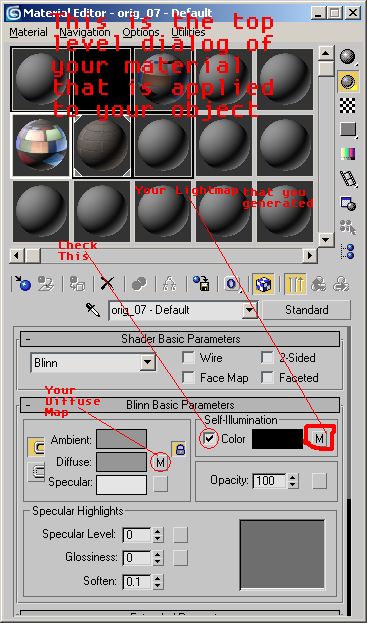
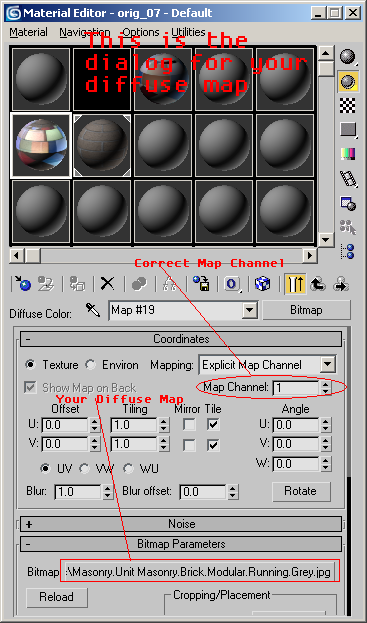
5.)You also need to make that the map channels are set correctly to your diffuse map and your illumination map. To do this, click on the slots where your diffuse map and your illumination map (your lightmap) is (with an M) and it will switch dialogs to show the map independent stuff. In this dialog, there will be a selector for which map channel is assigned to the map you are currently looking at. You need to change this to be the right map channel. For me, the diffuse map channel is 1, and the illumination map channel (which is for your lightmap) is 3.
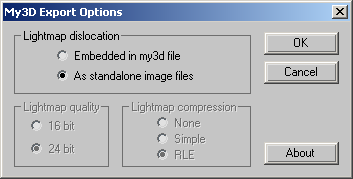
6.)File-Export-my3d. Choose to save and check standalone (lightmaps embedded never work for me). You also have to create a folder where your my3d model is that is called "Lightmaps" and you need to copy your lightmap there, or already have it there in a "Lightmaps" folder already created and have the material in 3ds max link straight to it at that location (that's what I do).
All you have to do to load the my3d model in C++ in main() or whatever before your irrlicht loop is:
Code: Select all
scene::IAnimatedMesh* my3dMesh = smgr->getMesh("media/my3dmesh.MY3D");
scene::IAnimatedMeshSceneNode* my3dNode = smgr->addAnimatedMeshSceneNode(my3dMesh);
Additional Notes:
- The lightmap uvs are best to be an automatic flattening. The reason for this is that you will not have to take the lightmap into photoshop and paint on it. There can be a million seams, and you don't have to worry about it because the render to texture automatically paints the lightmap on within the seams, and still has it all blend together. But if for some strange reason you want to have a uv template for your lightmap that has minimal seams, you can apply a unwrap uvw modifier and set the map channel box to whatever map channel you have for your lightmap, then just edit the uvs away. Additionally, if you don't want the render to texture to flatten the uvs automatically: apply a unwrap uvw modifier, select all the faces, click on edit in the modifier dialog, then go mapping->flatten mapping. This is the equivalent of the automatic flatten done by the render to texture.
You can also edit the parameters for the automatic uvw flattening in the render to texture dialog if you scroll down.
You do not have to use scmgr->getStringParameters()->setParameter(
scene::MY3D_TEXTURE_PATH, "path/to/your/textures" in the newest version of Irrlicht. I read this from a previous 3dsMax & my3d tut.
if your 3ds max scene has multiple objects, and multiple materials applied to them, then in step 3 select all of your objects, then go to render to texture and create lightmaps for all of them. Once you have these lightmaps, you can proceed through the tutorial except repeat the following steps for each material.
The uploaded zip file is here and is also linked now in my first post.This contains a VC++ 2008 project for loading .my3d scenes and contains a 3ds max 7 scene ("my3dTest.max") which
is fully ready to export to .my3d format.
If you do not have VC++ 2008, navigate to ".\my3d\my3d". This is where the two files for the program are,
main.cpp and globals.h. In ".\my3d\my3d\media" there are the files needed for the program to run,
including textures lightmaps, and my3d meshes. There is more than one my3d sample mesh to load in the
media directory, so you can edit main.cpp to load other sample my3d scenes.
Frostysnowman4@hotmail.com


