Post Your Irrlicht Screenshots / Render Here.

Post your questions, suggestions and experiences regarding to Image manipulation, 3d modeling and level editing for the Irrlicht engine here.
mk.1
Posts: 76
Joined: Wed Oct 10, 2007 7:37 pm

Post by mk.1 »

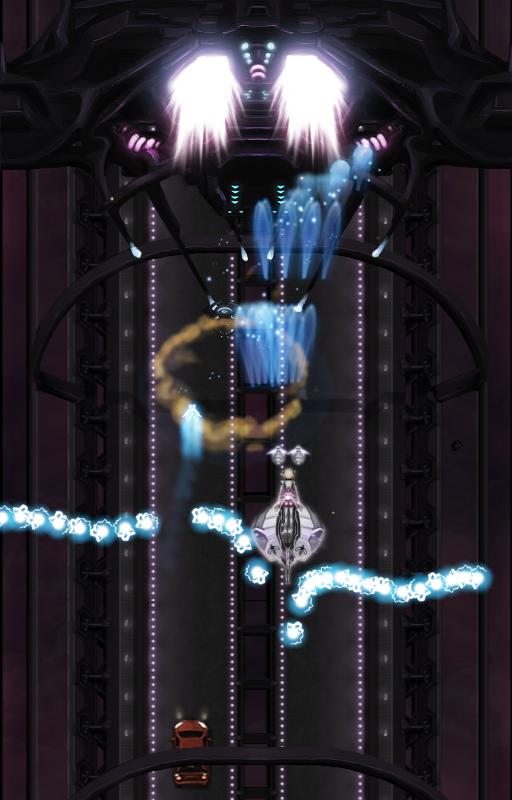
Image

Fast game so taking screenshots isn't easy and it looks much better in motion

video
Eigen
Competition winner
Posts: 375
Joined: Fri Jan 27, 2006 2:01 pm
Location: Estonia
Contact:

Post by Eigen »

Oooh! Nice, very nice. I like the particle effects. They look really smooth, expecially in motion. Actually everything looks really professional. Good job.
JP
Posts: 4526
Joined: Tue Sep 13, 2005 2:56 pm
Location: UK
Contact:

Post by JP »

Wow that's some damned nice graphics mk.1! Looks like a decent game!

I think the shooting could look nicer though... not sure how but some sort of tweaking... maybe changing the colour the further they are from the shooter..? Making them lighter or darker.. fading them out a bit.. i dunno...
Image Image Image
Mel
Competition winner
Posts: 2292
Joined: Wed May 07, 2008 11:40 am
Location: Granada, Spain

Post by Mel »

That's an acid screen! XD it is cool!
"There is nothing truly useless, it always serves as a bad example". Arthur A. Schmitt
SwitchCase
Posts: 170
Joined: Sun Jul 01, 2007 11:41 pm
Location: Manchester, UK

Post by SwitchCase »

Nice stuff mk.1, looks fantastic. I do agree that the shooting could look a bit better though as suggested. Perhaps, more transparency the "younger" each projectile is - based on an absolute cubic value maybe??? (i.e. A steep curve).

Keep at it. :D
mk.1
Posts: 76
Joined: Wed Oct 10, 2007 7:37 pm

Post by mk.1 »

Maybe you can see the little thingy with a blue trail that breaches the bullet "wall". It's called Force and gets bigger when certain conditions are fulfilled. With the Force leveling up the shots get stronger and more opaque. The image but also the video don't really show the bullet movement as it is in the game and it looks much better, but I'm aware of the problem.
Please notice that everything you see is still wip.
fmx

Post by fmx »

still looks great though mk1, looking forward to playing it and seeing it in all its real glory!
:)
oldskoolPunk
Posts: 199
Joined: Wed Nov 29, 2006 4:07 am

Post by oldskoolPunk »

Glsl texture projection....

Trial and error phase

Image

Image

Image

Image

Image

I am to the point of starting a thread in hopes that someone will take my hand and lead me through this matrix hell.

P.S. mk.1 that is beautiful! I will definitely check this one out.
Signature? I ain't signin nuthin!
BlindSide
Admin
Posts: 2821
Joined: Thu Dec 08, 2005 9:09 am
Location: NZ!

Post by BlindSide »

I am to the point of starting a thread in hopes that someone will take my hand and lead me through this matrix hell.
Just look through the XEffect's source code, it's all there. Also, I am planning to contribute some fixed function projective texturing materials for Irrlicht, which don't require any shaders to work.

Cheers
ShadowMapping for Irrlicht!: Get it here
Need help? Come on the IRC!: #irrlicht on irc://irc.freenode.net
oldskoolPunk
Posts: 199
Joined: Wed Nov 29, 2006 4:07 am

Post by oldskoolPunk »

BlindSide wrote:
Just look through the XEffect's source code, it's all there
I know! I have it right in front of me, trust me :) I have learned alot from all your examples. But this is still a little over my head right now. And your glsl writing style is quite different from they way I have learned, so it takes me a little time to understand it. I was thinking about looking into HLSL so I can better understand all the INS and OUTS :D
Signature? I ain't signin nuthin!
BlindSide
Admin
Posts: 2821
Joined: Thu Dec 08, 2005 9:09 am
Location: NZ!

Post by BlindSide »

Well the third and fifth photos certainly look promising. Are you remembering to check your projected texcoords and discard them if they are outside the 0-1 range? Also you need to multiply them by 0.5 and add 0.5 to get them into the 0-1 range first.

So:

Code: Select all

Texcoords.xy = Texcoords.xy * vec2(0.5, 0.5) + vec2(0.5, 0.5);
To get them from -1.0-1.0 to 0.0-1.0 range, and only use them when they are in the 0.0-1.0 range (Else they are outside the projection frustum.), you have to check it like so:

Code: Select all

if(clamp(Texcoords.xy, vec2(0.0, 0.0), vec2(1.0, 1.0)) == Texcoords.xy)
{
    // Only use them here. Else it has no effect or is cleared to a flat color.
}
If you have the Z component handy also make sure to check for Texcoords.z > 0.0 so that you don't get back projection, thats when the projection source projects opposite to the direction it's facing.

The shadowmapping shaders in XEffects aren't very well commented so hopefully this clears some issues as to what I'm doing in there. If theres any particular parts you are confused about feel free to ask :)
ShadowMapping for Irrlicht!: Get it here
Need help? Come on the IRC!: #irrlicht on irc://irc.freenode.net
dlangdev
Posts: 1324
Joined: Tue Aug 07, 2007 7:28 pm
Location: Beaverton OR
Contact:

Post by dlangdev »

dude, i see that code in almost all shader code, but I still don't understand why they need to be to translated from one to the next. Can someone post a URL for that concept, thanks.
Image
mk.1
Posts: 76
Joined: Wed Oct 10, 2007 7:37 pm

Post by mk.1 »

Image
jontan6
Posts: 278
Joined: Fri Jun 13, 2008 5:29 pm

Post by jontan6 »

Image
mk.1
Posts: 76
Joined: Wed Oct 10, 2007 7:37 pm

Post by mk.1 »

You should really place the forks 180° rotated - nobody would place them like this.

Some kind of specular on the glasses?

Everything else looks very nice. I especially like the vases
Post Reply